

Making a great dog wheelchair work better for a very small dog

Sometimes you buy a well-designed product, use it for a while, and discover that for your particular situation it could use just a little improvement.
And sometimes “a little improvement” somehow turns into recreating half the thing in CAD, designing a suspension system, adding ball bearings, printing custom parts and rebuilding the rear end.
This was one of those times.
Our dachshund suffered a herniated disc that left his left hind leg almost completely paralyzed and significantly reduced the control of his other hind leg. Indoors he adapted remarkably well and could get around mostly using three legs. Outside, however, that only worked for short distances.
To give him more freedom, we bought a Walkin’ Pets Dog Wheelchair. Pls see https://walkinpets.com/. It is a solid, well-made product and gave him the opportunity to walk outside again.
But because he is a small dachshund — with a long back that had already been injured — I soon noticed a few things that could be improved specifically for him.
The problems
The first problem was rolling resistance.
For a larger dog, the resistance of the original wheels probably isn’t particularly significant. For a small dachshund, however, every bit of additional resistance matters. He had to work noticeably harder to pull the wheelchair along.
The second problem was rigidity.
The original construction keeps the wheels firmly positioned relative to the frame. That’s normally exactly what you want, but in his case bumps, uneven pavement and stepping off a curb transferred movement directly through the wheelchair.
Because of his back injury, he compensated for this by walking rather stiffly.
The third problem appeared around doorways and other obstacles.
Take a corner just a little too tightly and a wheel can catch the door frame. Instead of sliding past the obstacle, the wheelchair suddenly stops or jerks sideways.
Again: not particularly pleasant when the passenger happens to have a bad back.
So…
CAD time.
Rebuilding the wheel assembly
I recreated the relevant parts of the wheelchair in 3D and started experimenting with alternative wheel assemblies.
The eventual design combines three modifications:
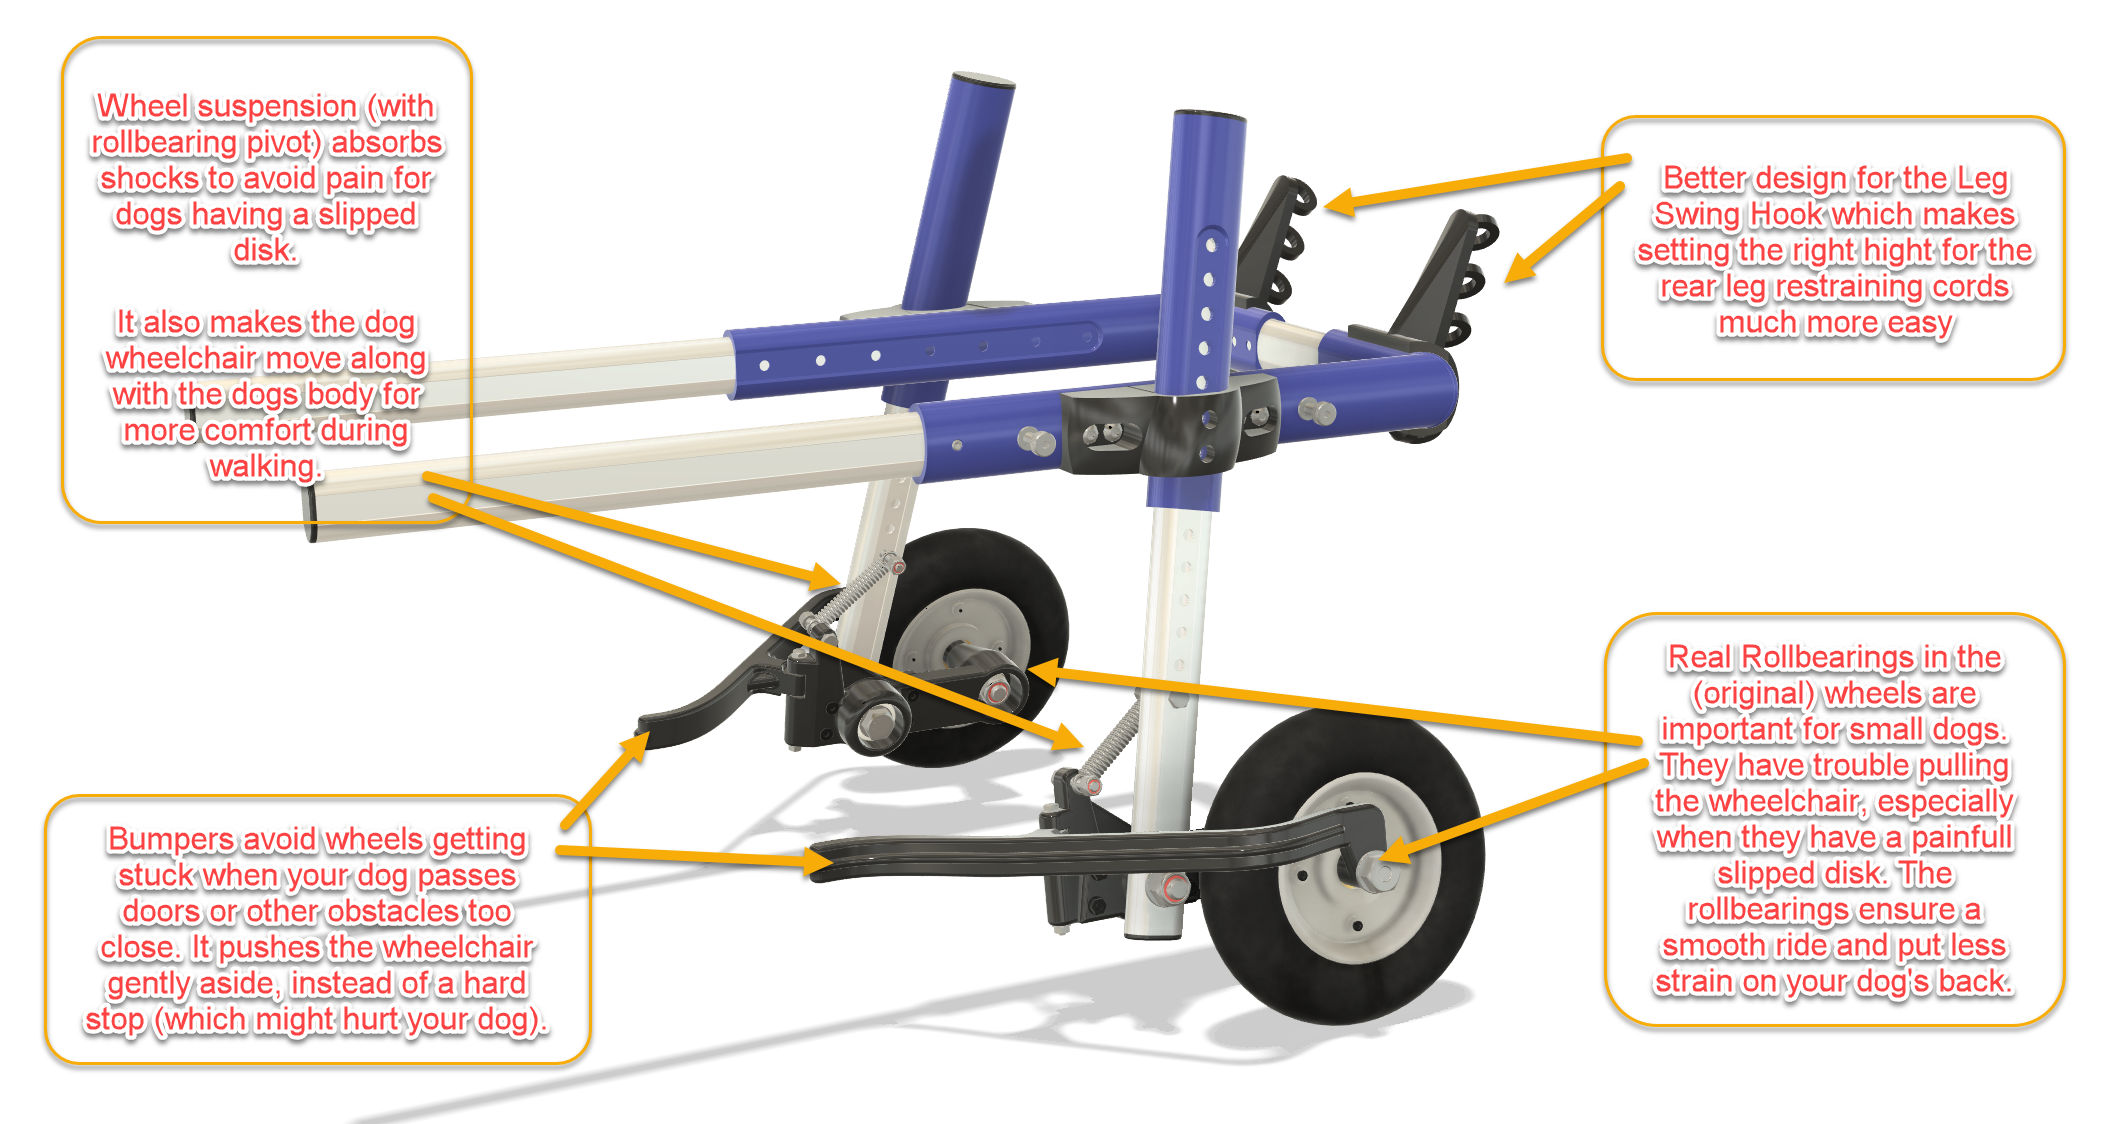
Ball-bearing wheels
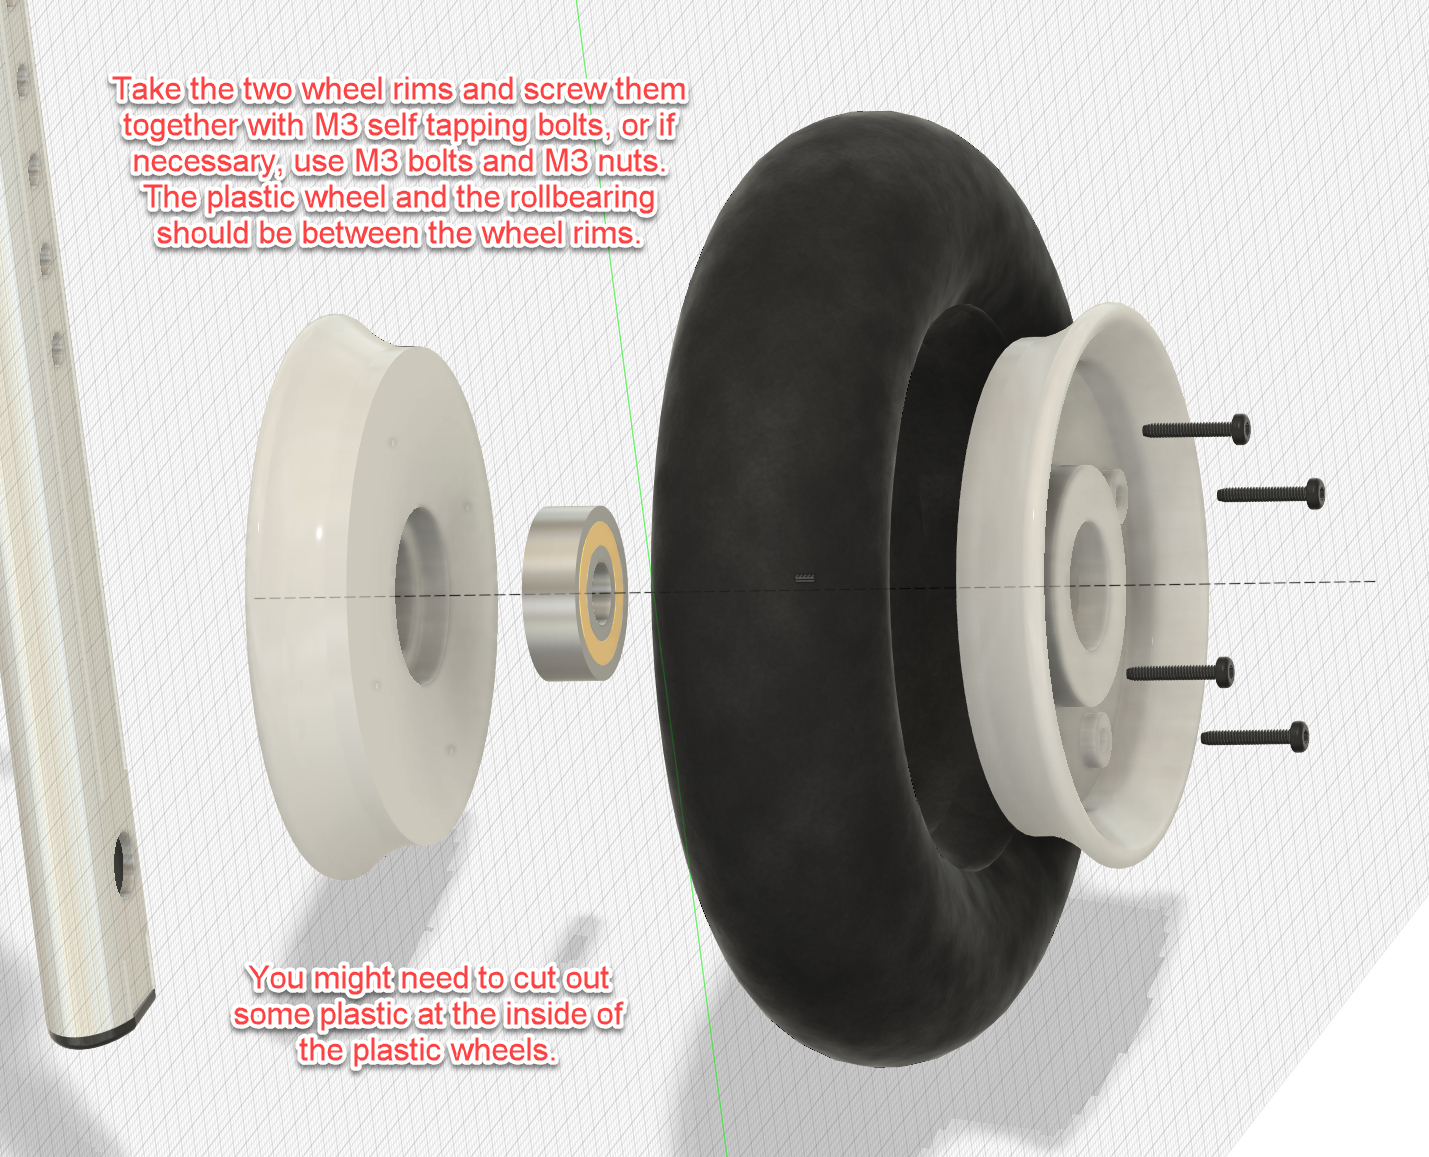
The original wheels were modified to run on proper ball bearings.
This considerably reduced the rolling resistance. For a small dog this makes a surprisingly large difference: less effort is needed simply to keep the wheelchair moving.
The improvement was immediately noticeable during walks.
Independent trailing-arm suspension
This became the largest part of the modification.
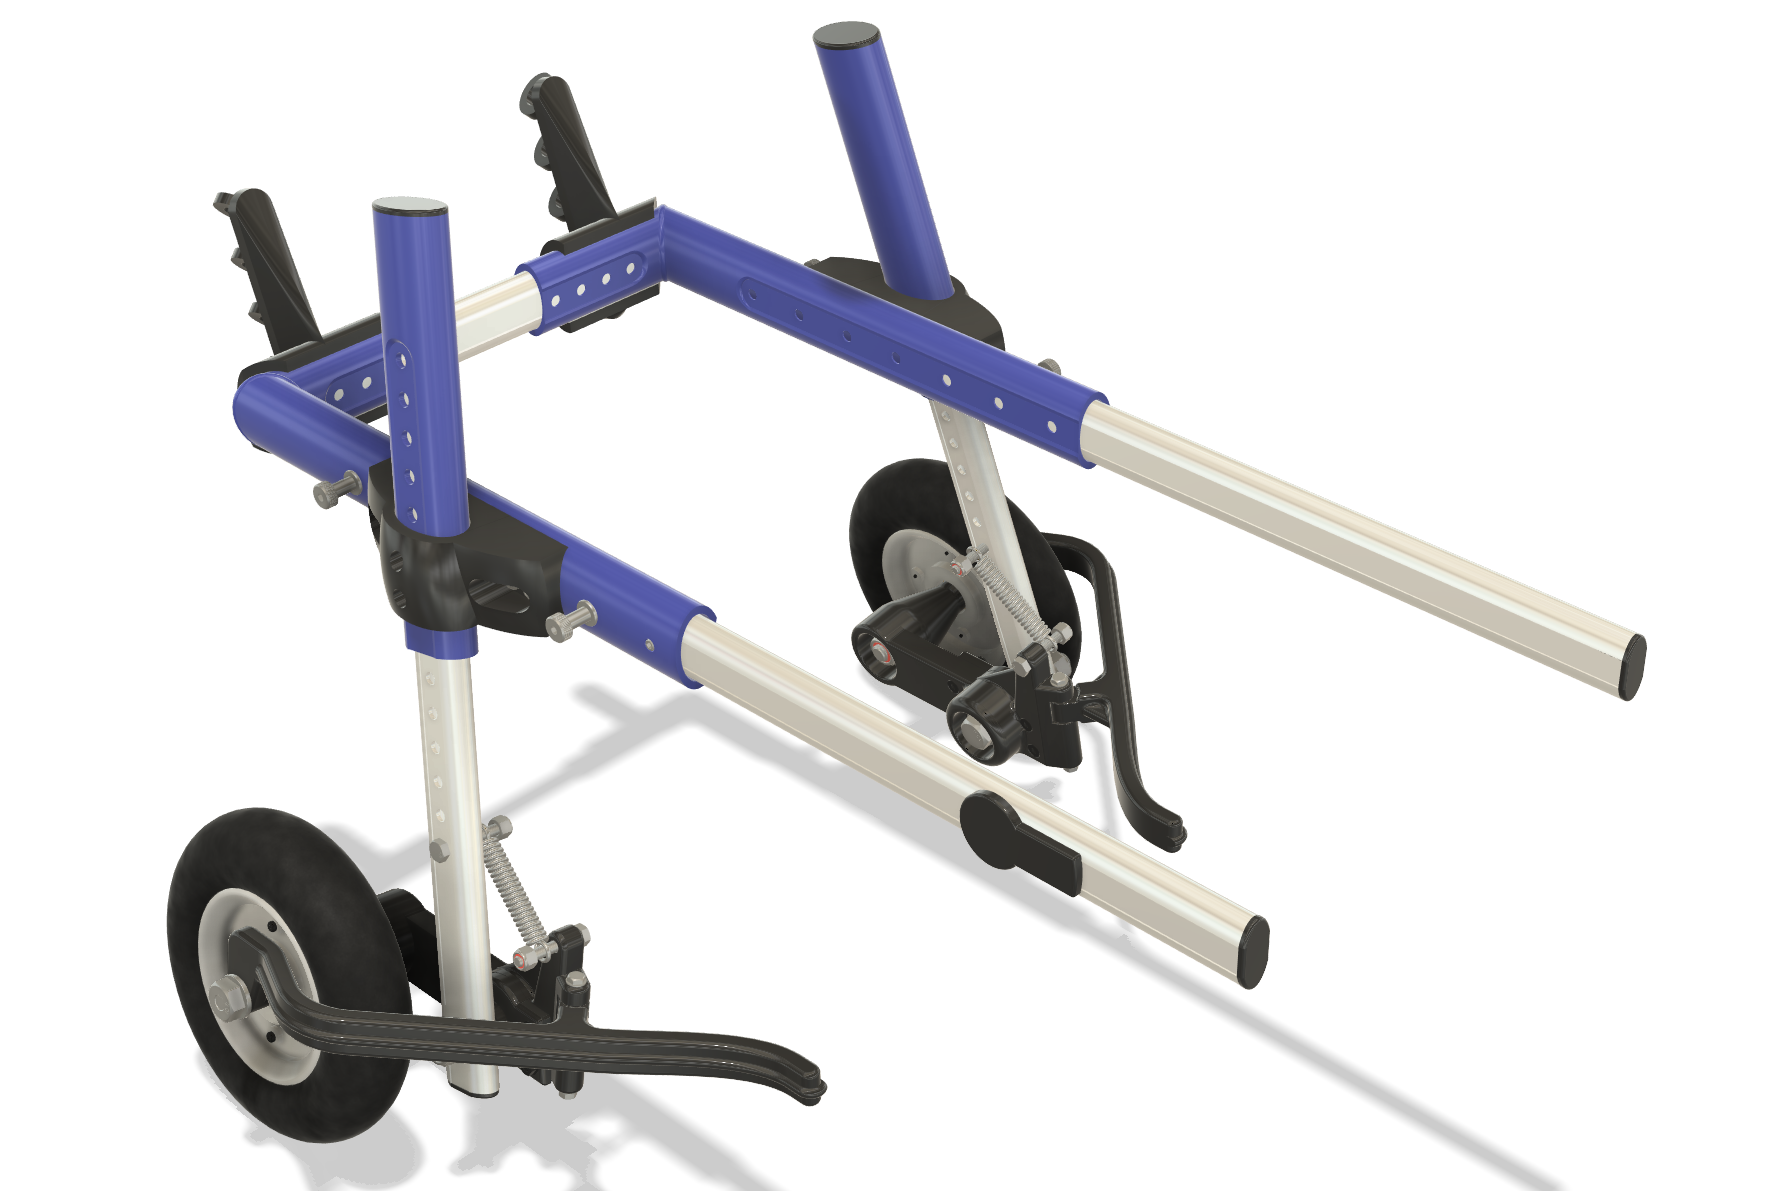
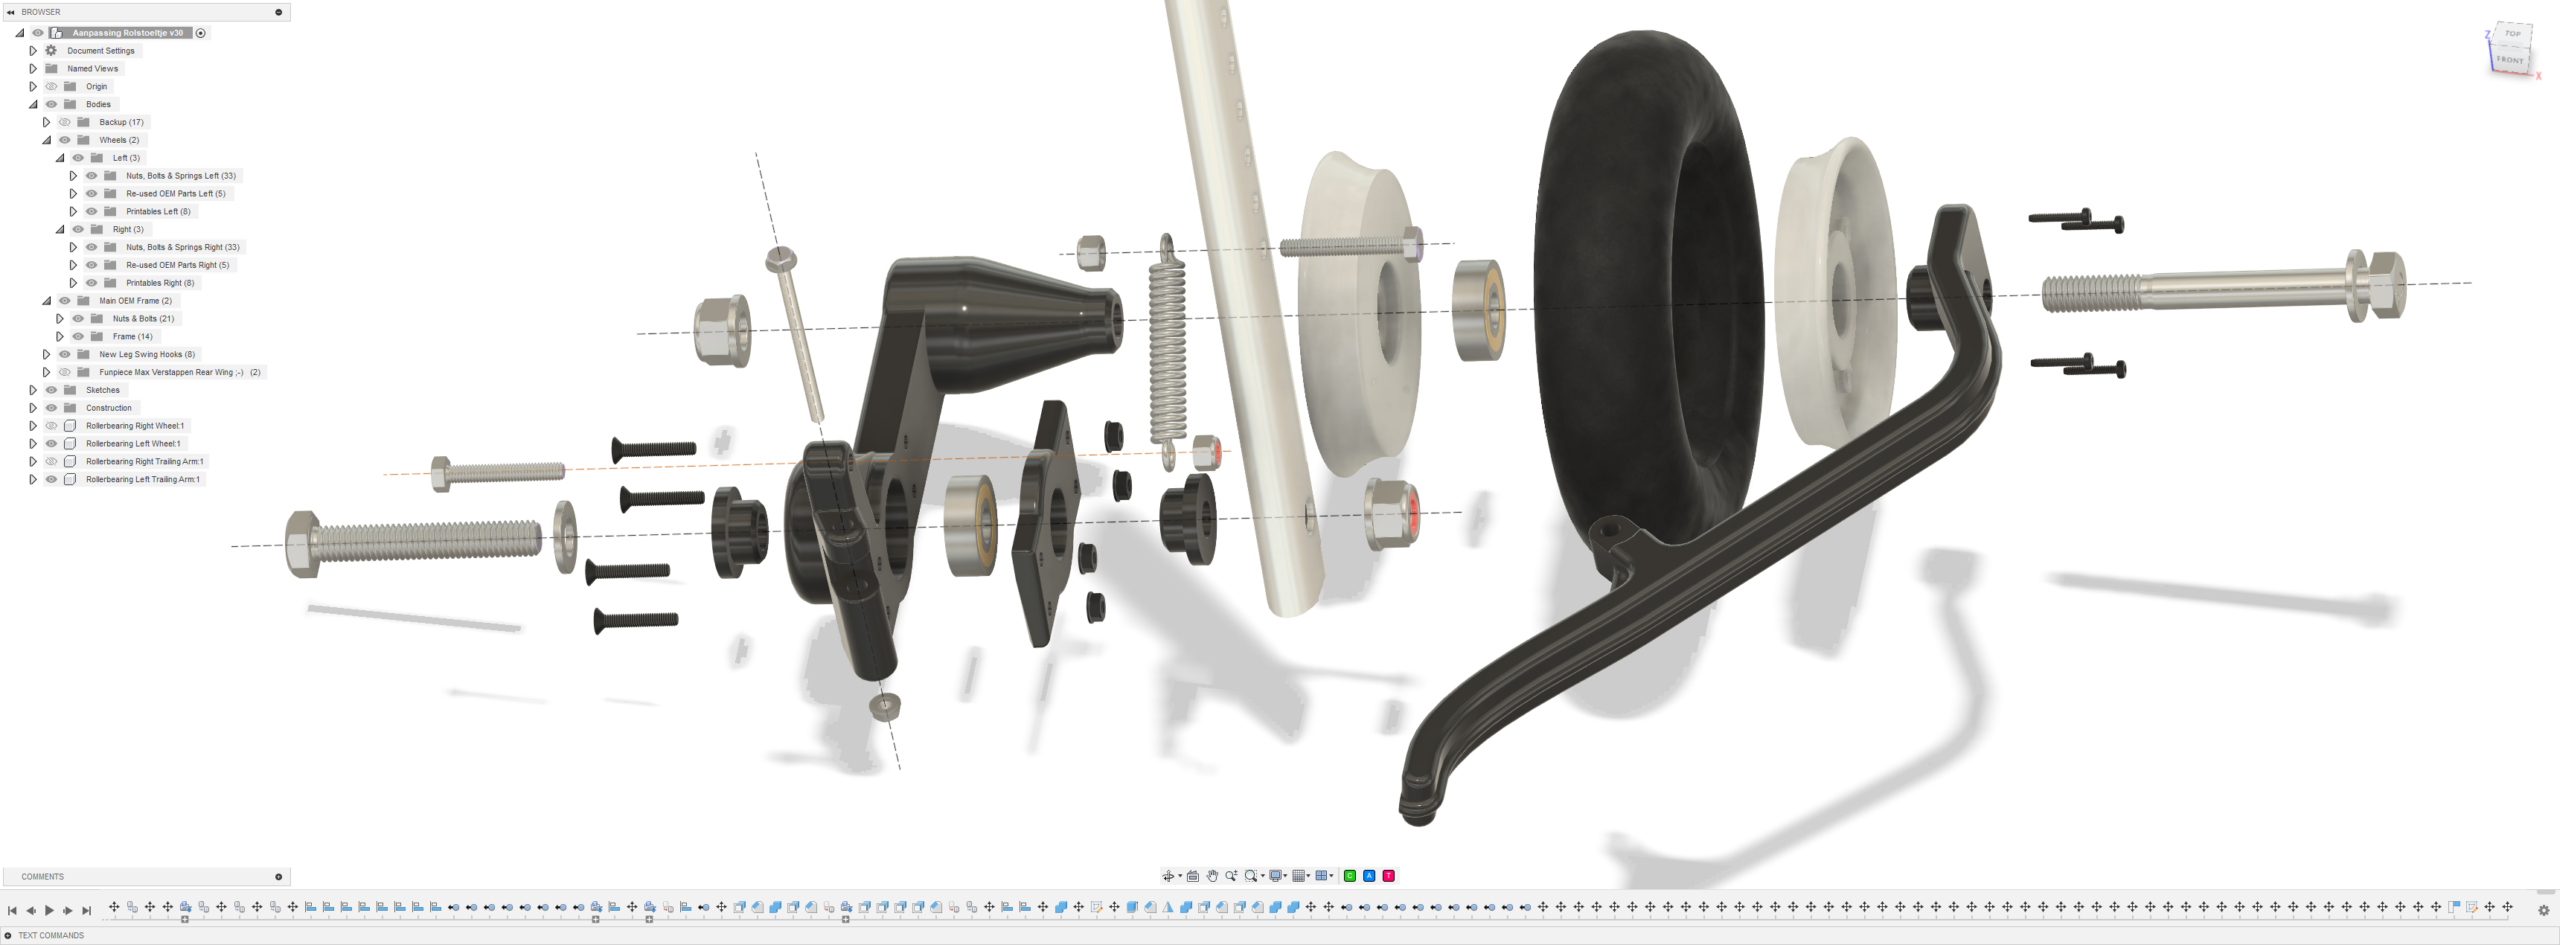
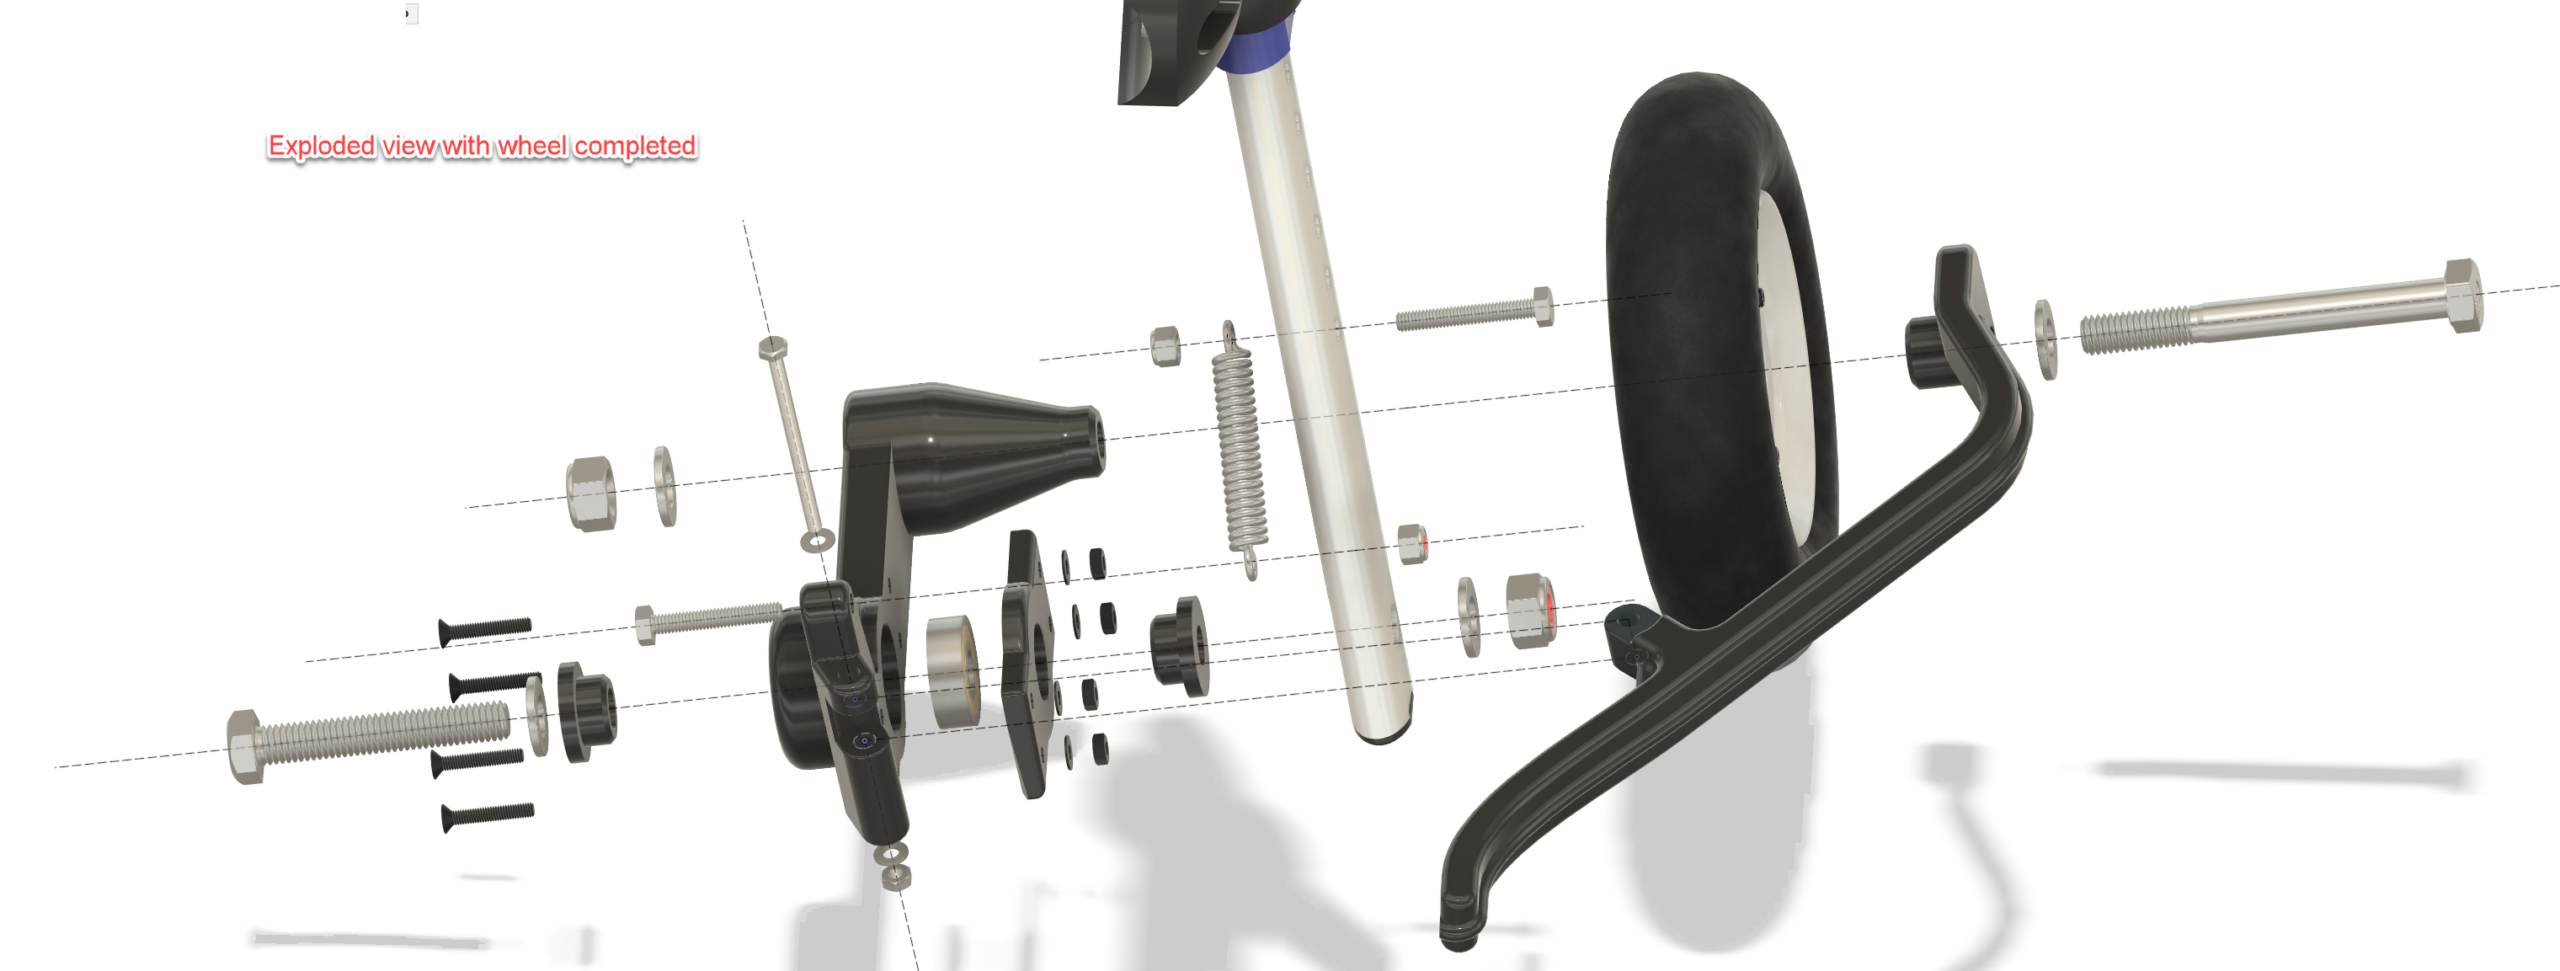
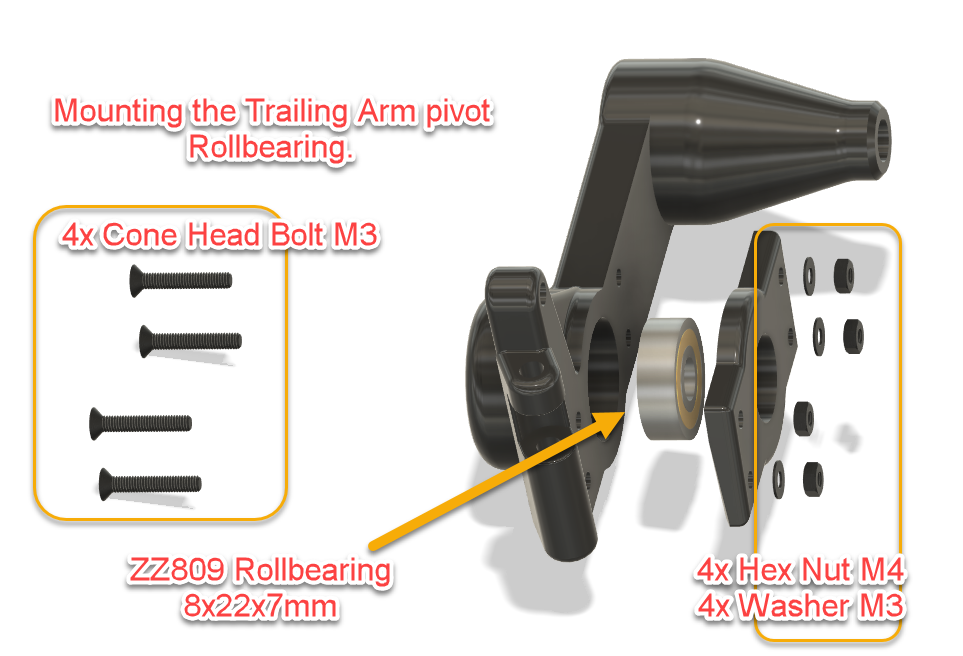
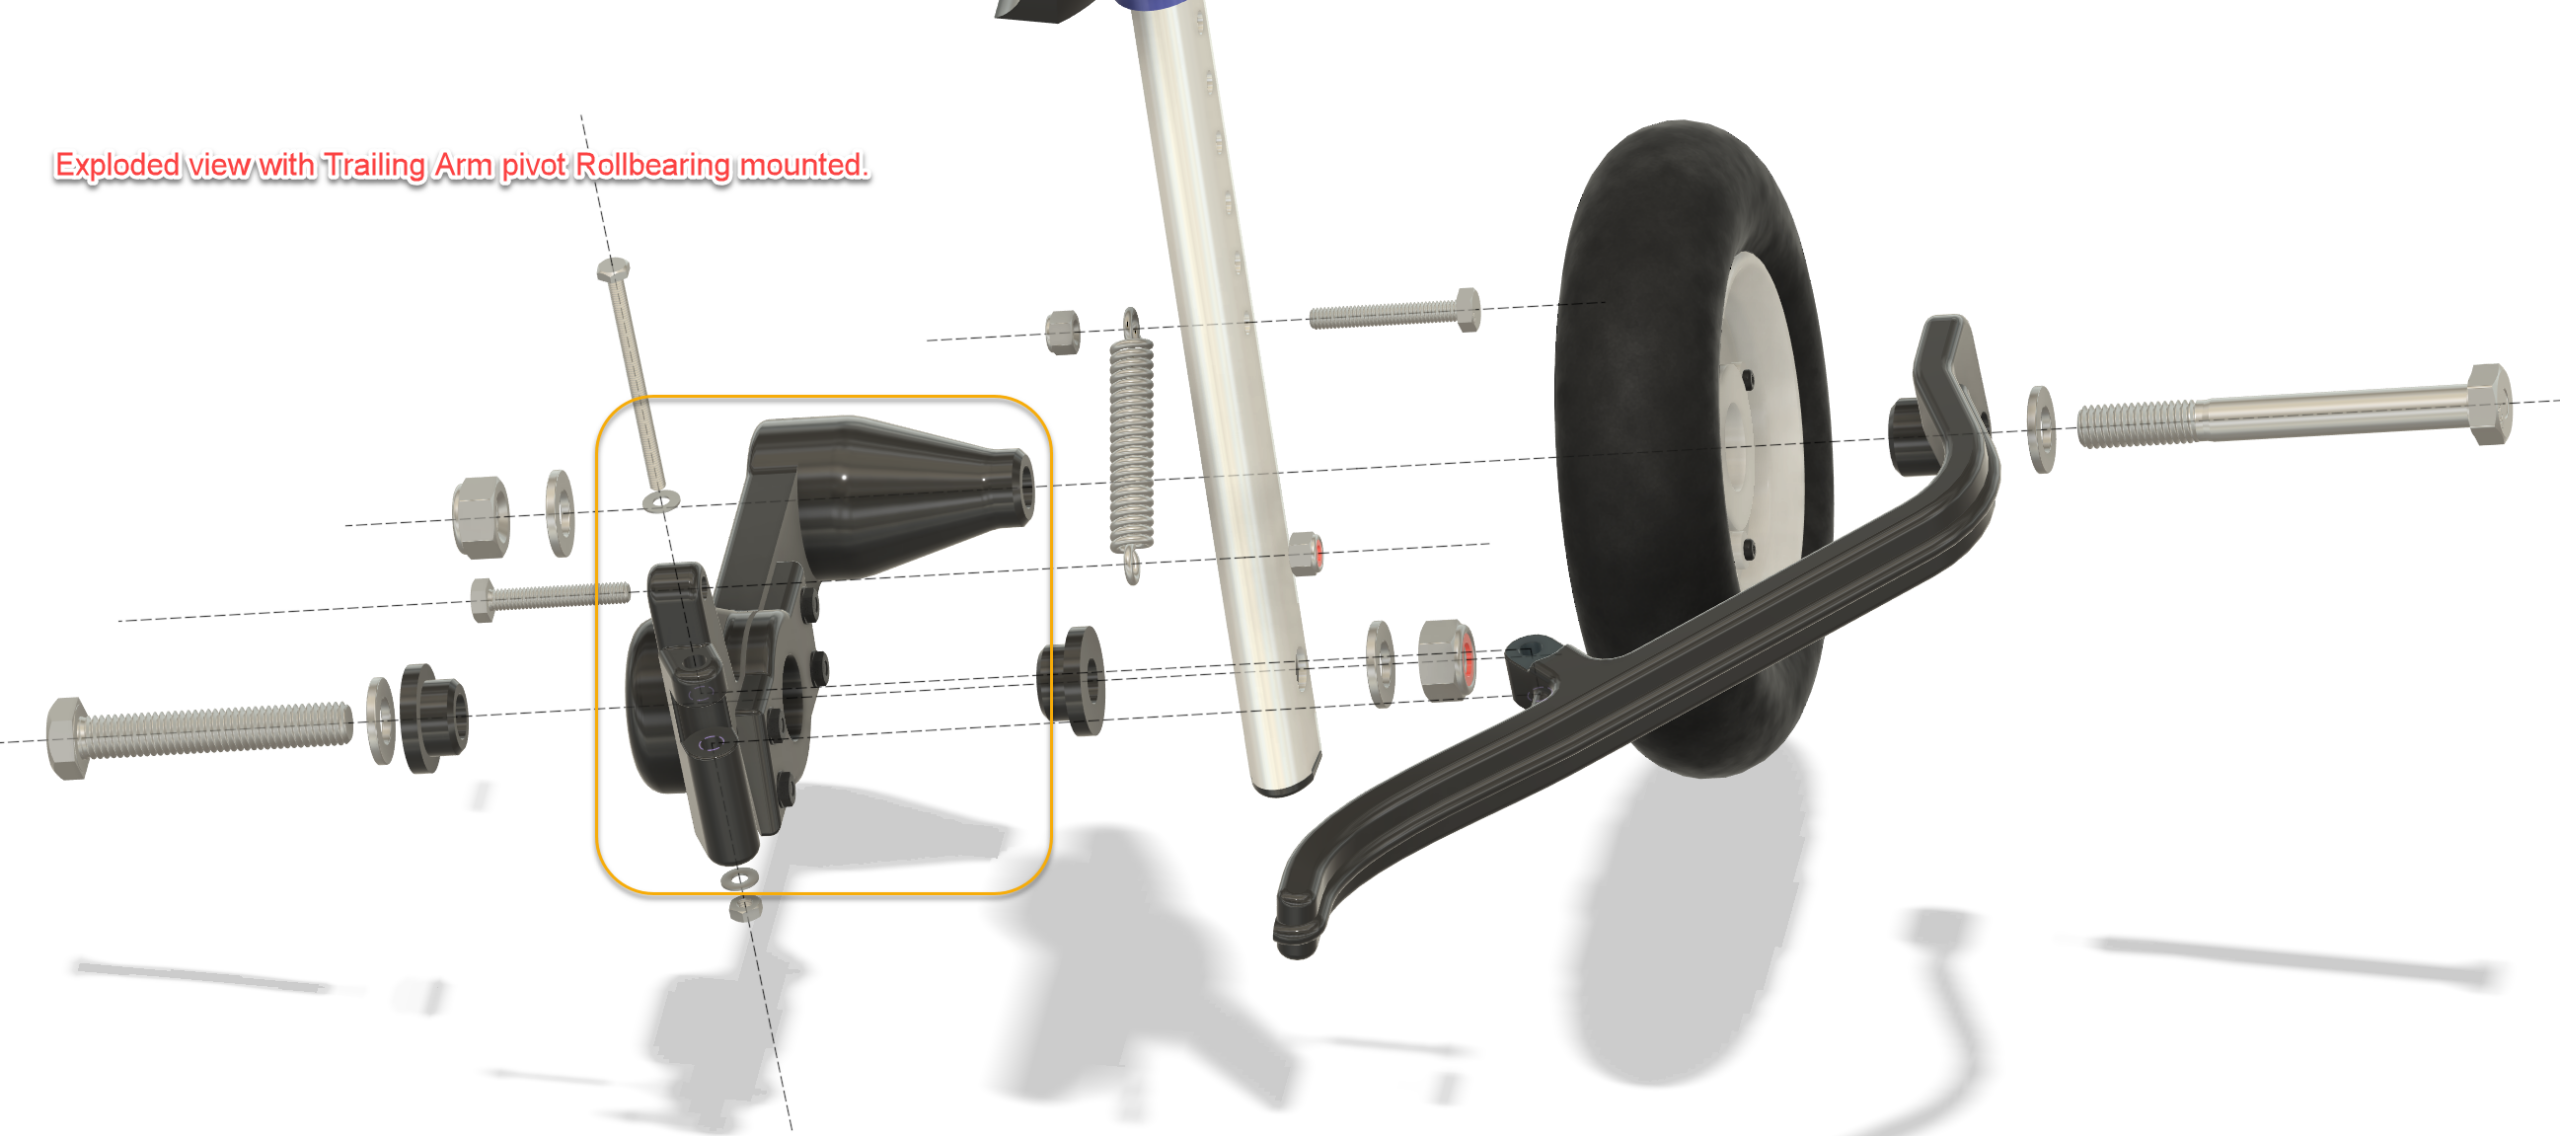
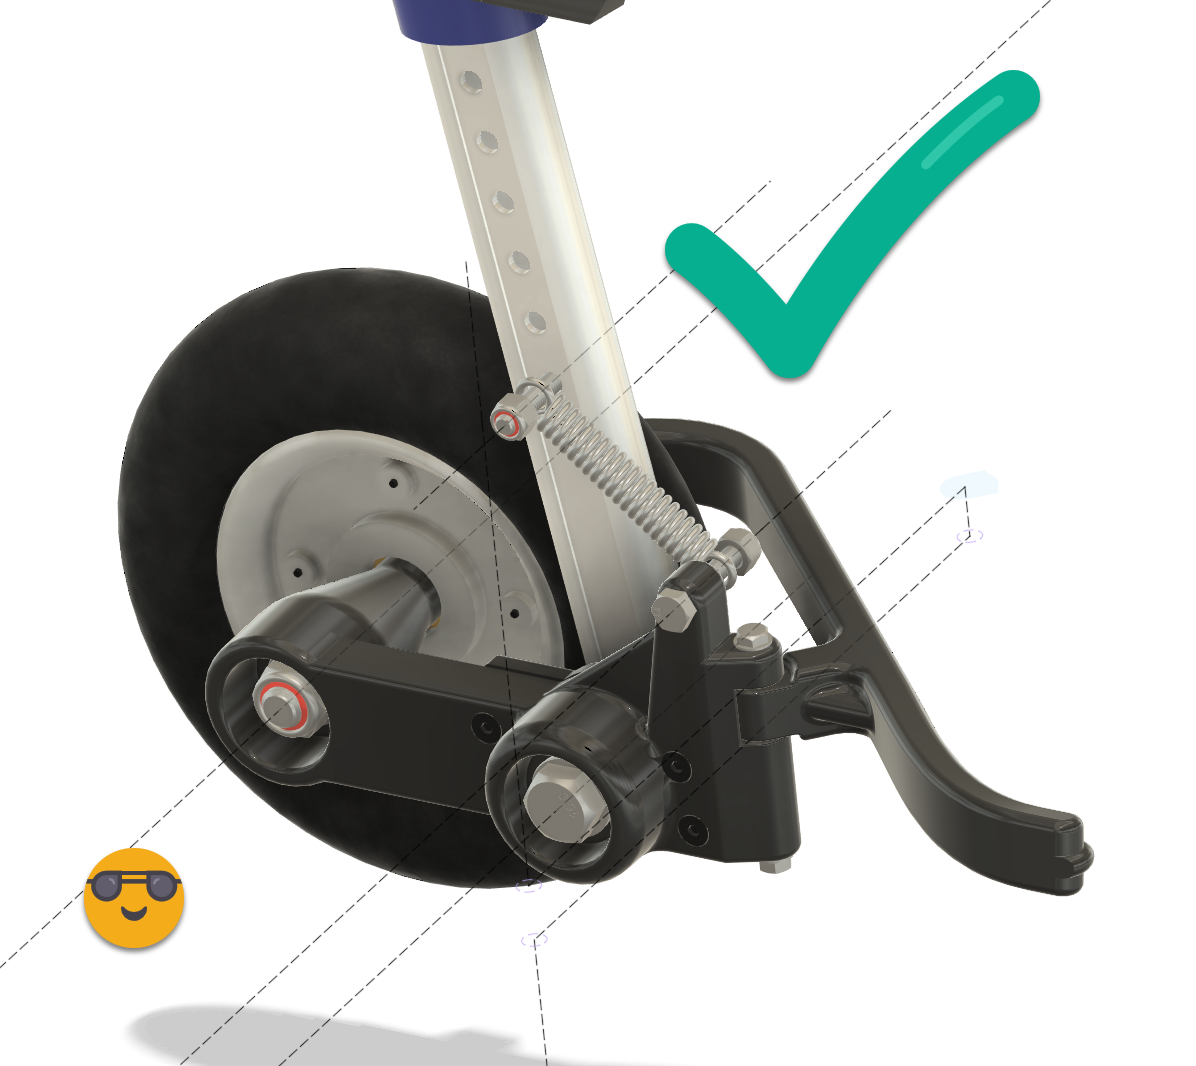
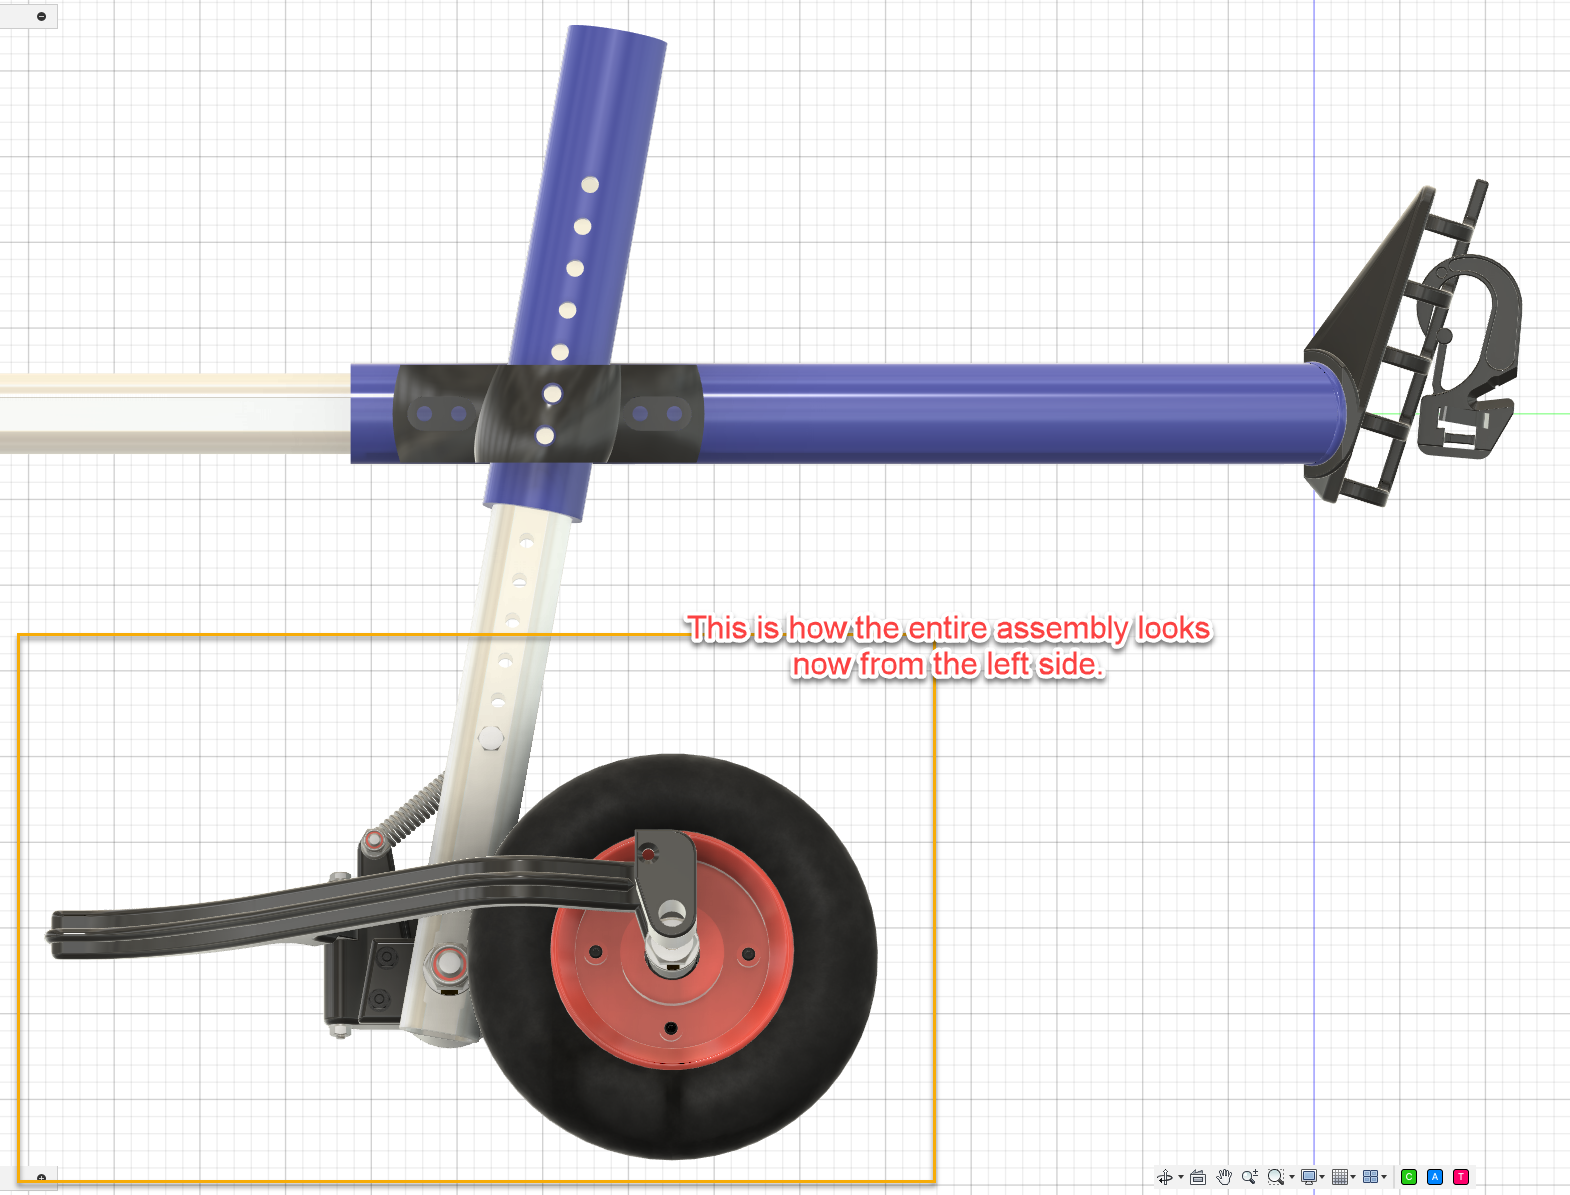
Each wheel is mounted on a pivoting trailing arm running on a ball bearing. A spring between the trailing arm and the wheelchair leg provides suspension.
Instead of every bump being transmitted directly into the frame, the wheel can now move independently.
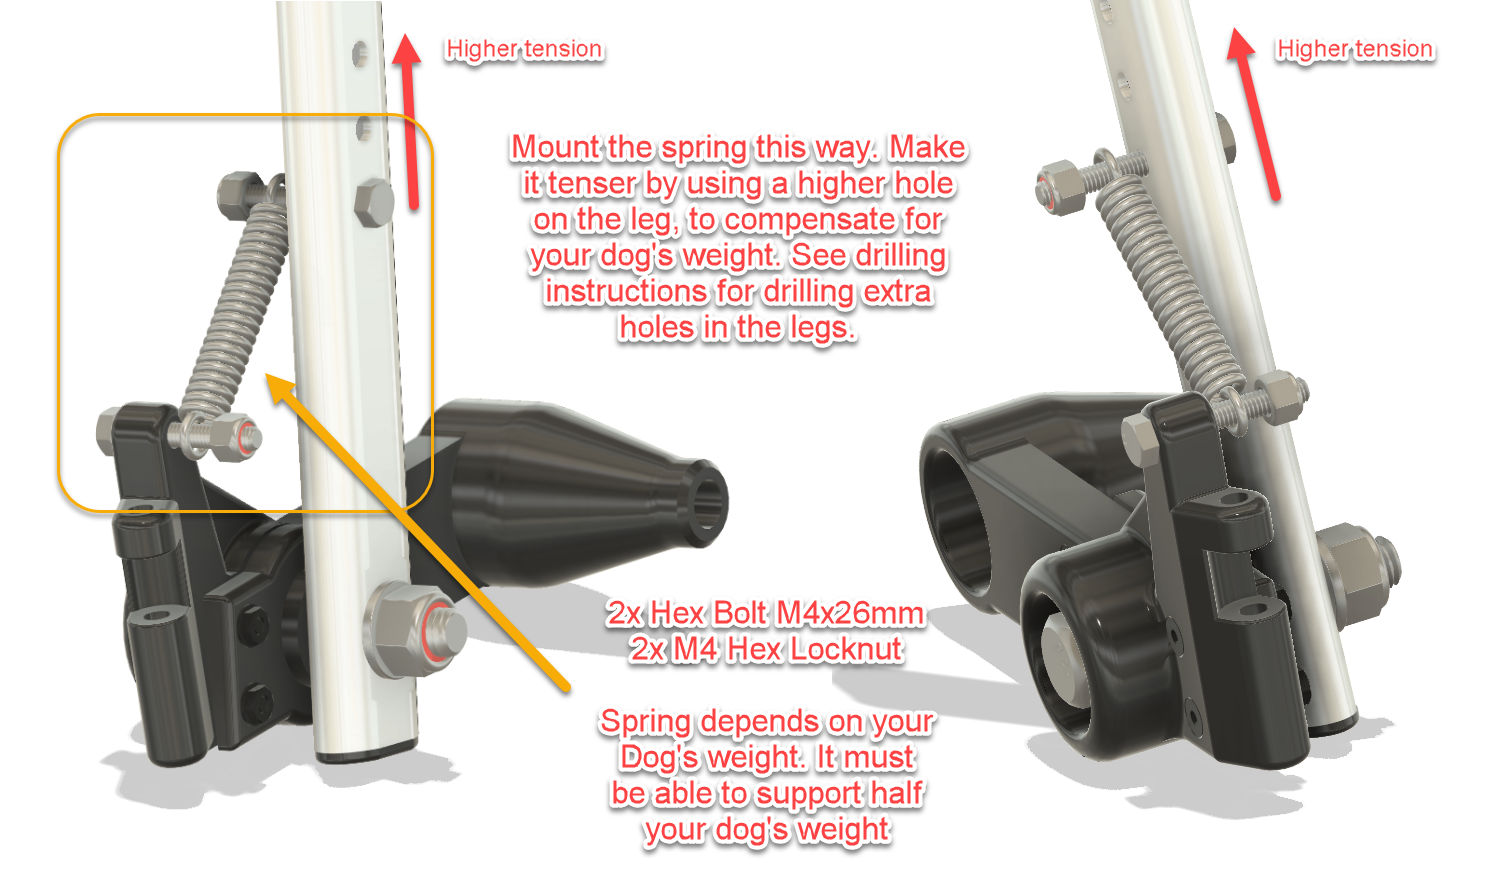
The spring preload can be adjusted by selecting a different mounting hole in the wheelchair leg. This makes it possible to tune the suspension for the weight of the dog.
The goal isn’t to turn the wheelchair into a miniature off-road vehicle — tempting though that idea may be — but simply to let the wheels follow small irregularities in the ground without forcing the dog’s body to follow every movement.
The result is a noticeably smoother and more natural ride.
Wheel guard rails
The long curved guards around the wheels solve another very practical problem.
If the wheelchair passes too close to a door frame, furniture or another obstacle, the guard touches it before the wheel does.
Its curved shape then gently guides the wheelchair away from the obstacle rather than allowing the wheel to catch abruptly.
Simple idea. Surprisingly effective.
A few modifications to the original wheelchair
The conversion does require some changes to the original frame.
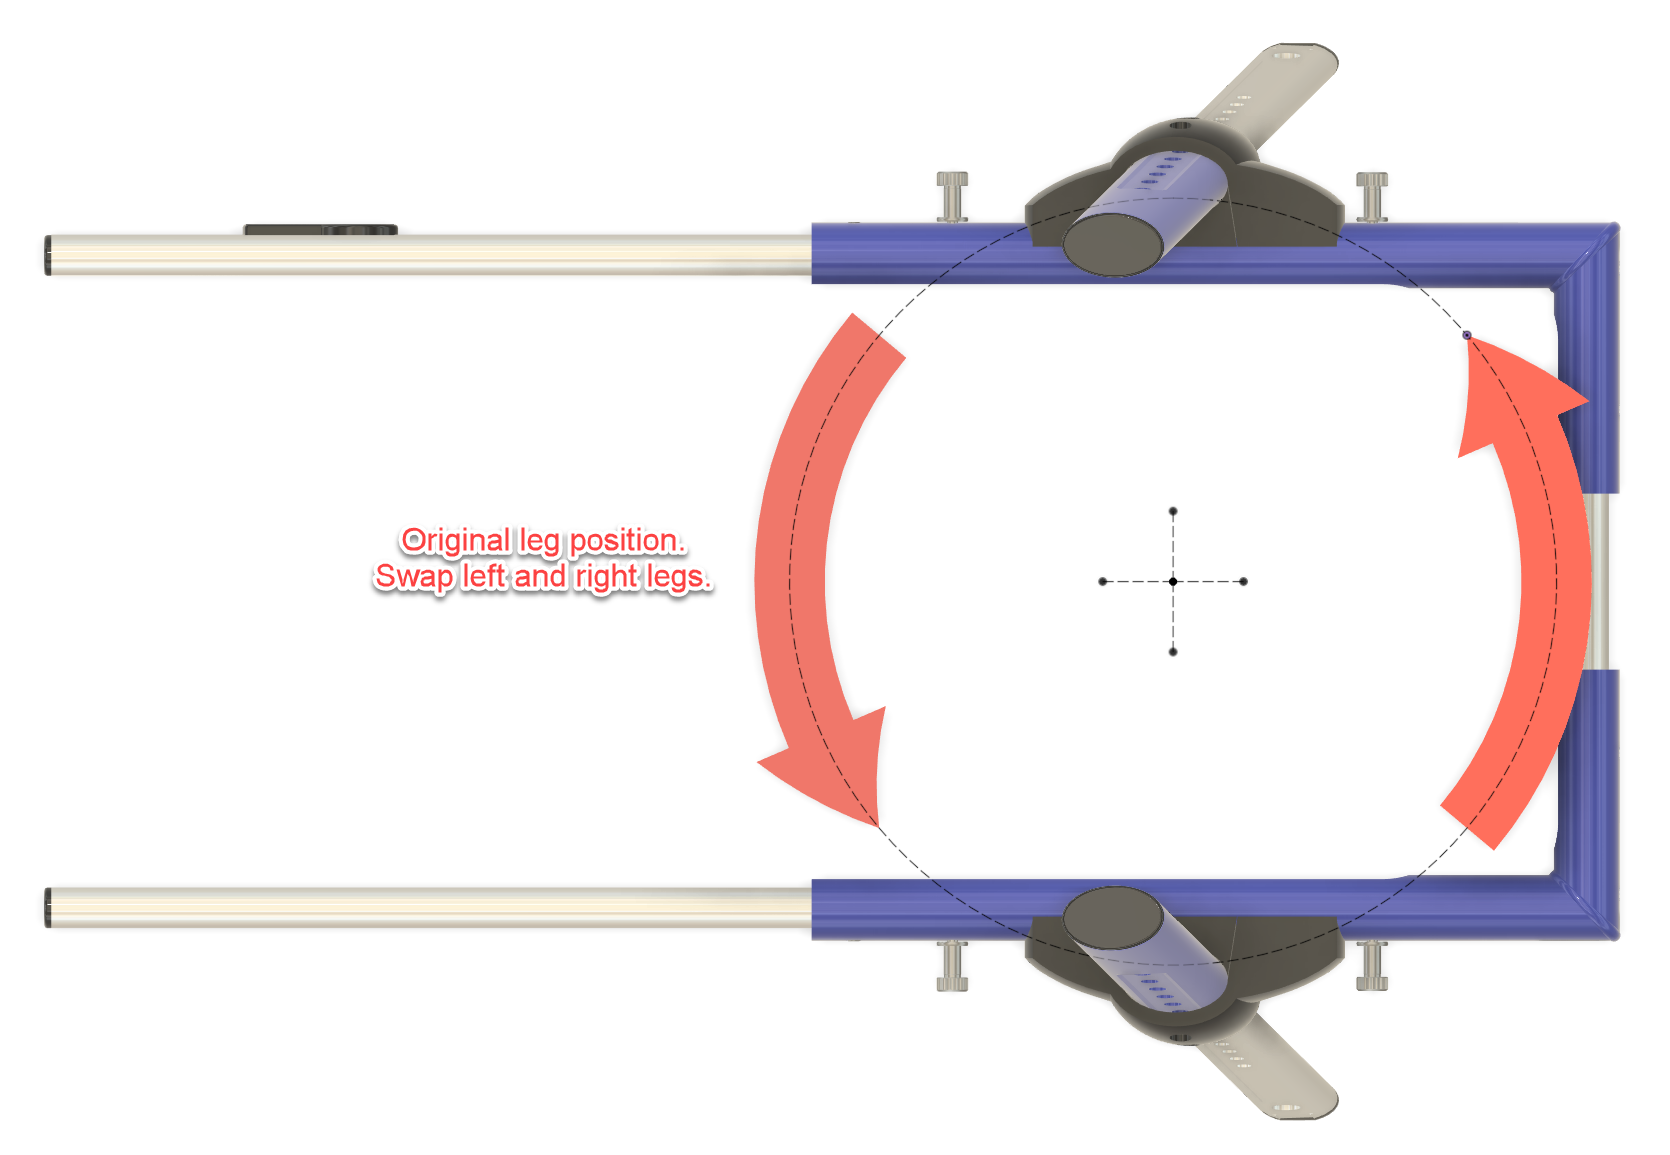
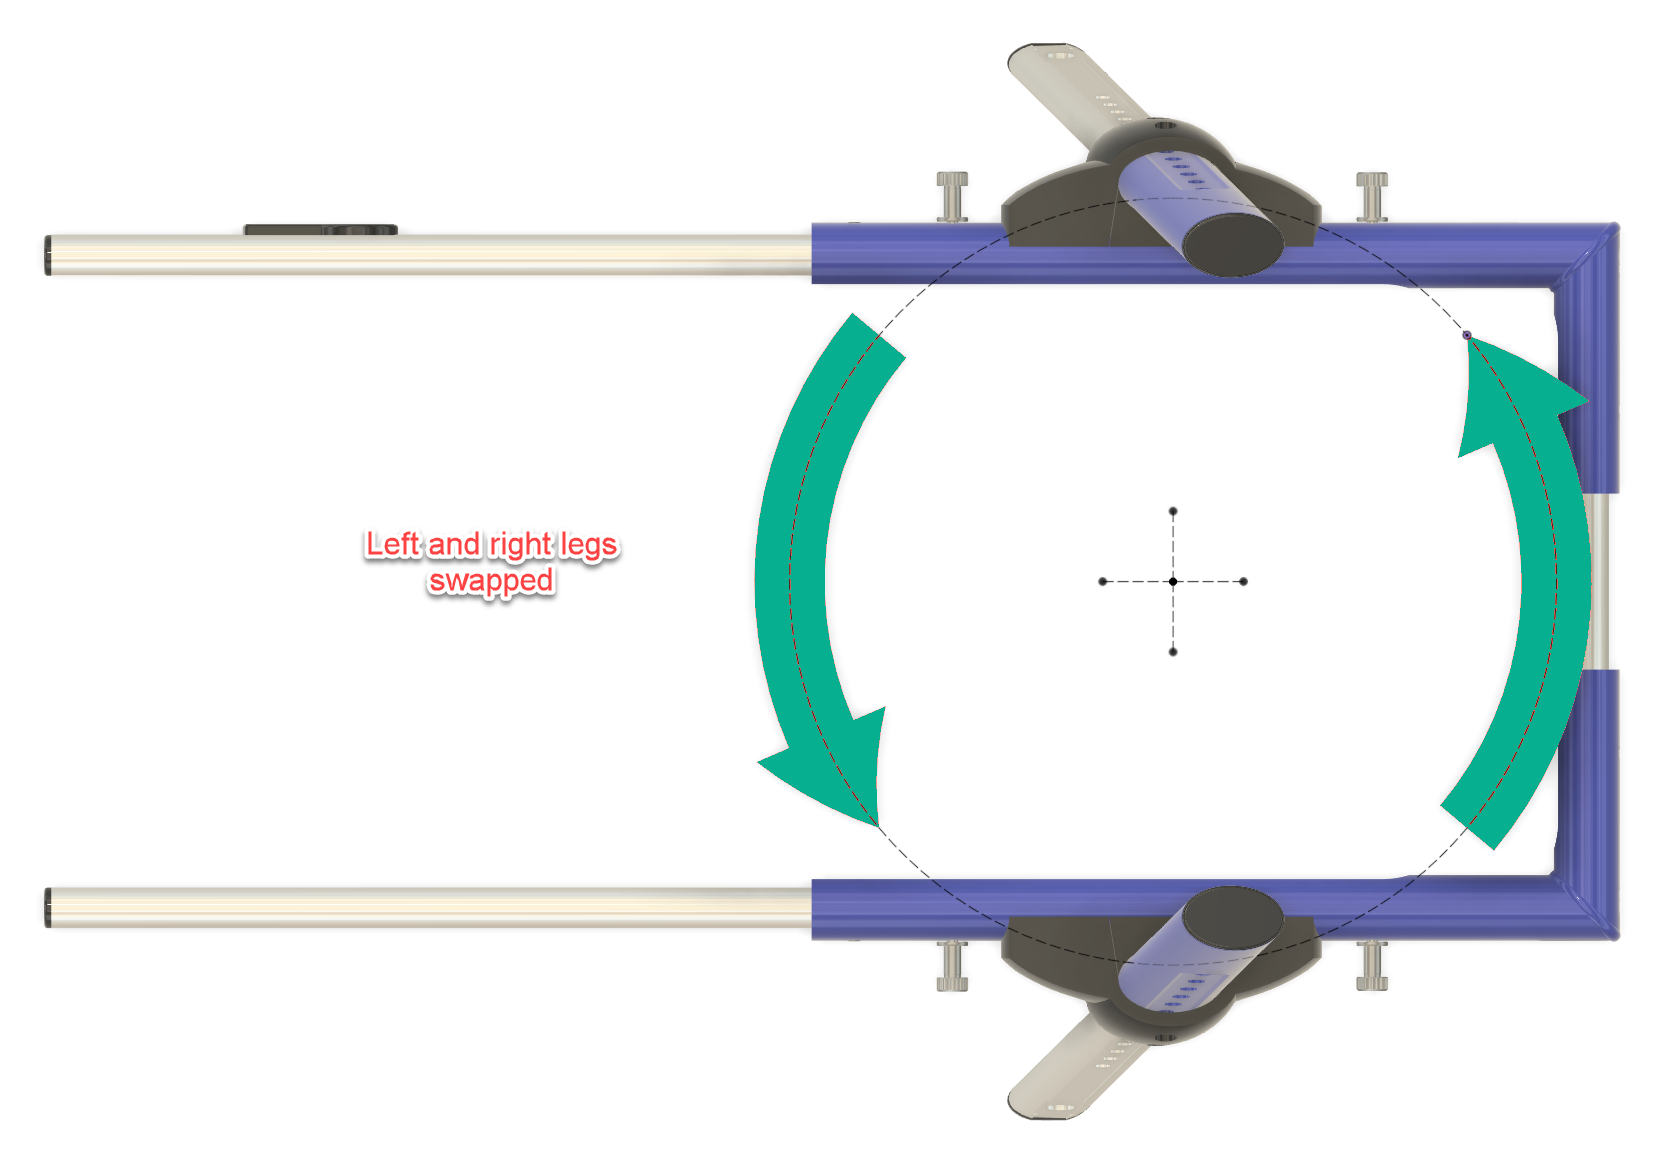
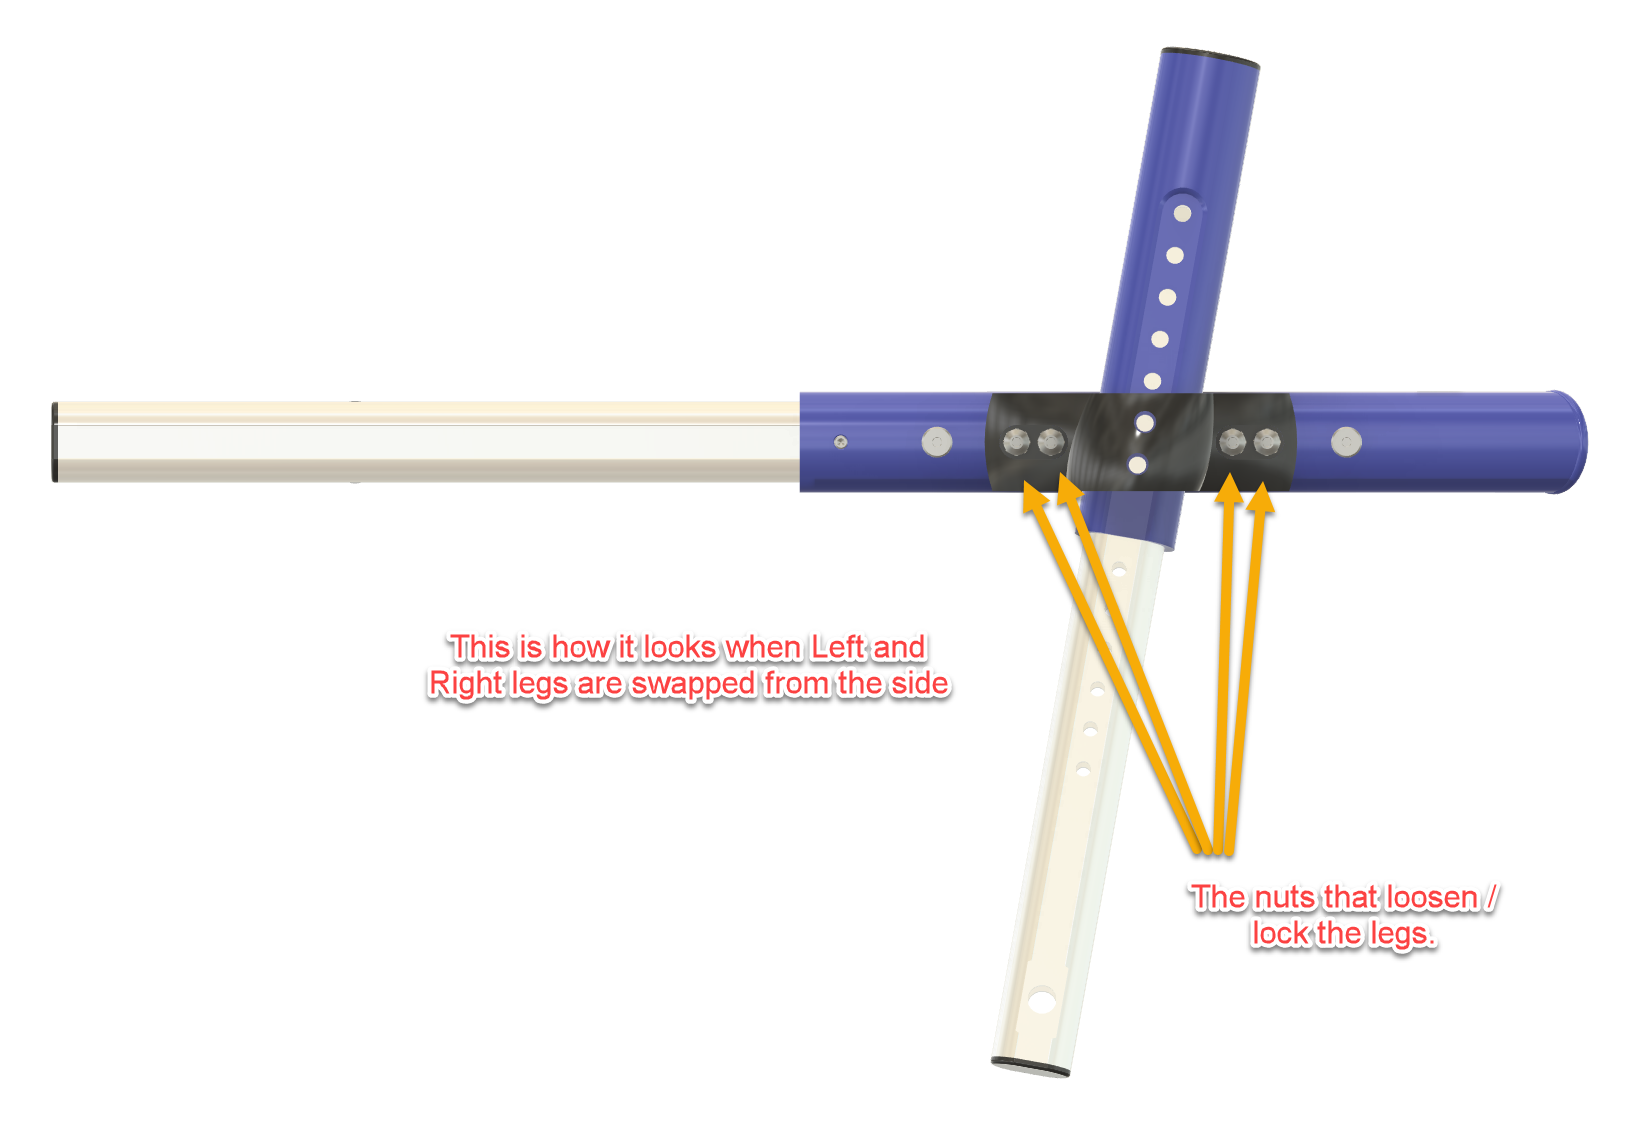
The left and right wheelchair legs are swapped, which changes the orientation of the wheel assemblies and provides the geometry needed for the trailing-arm suspension.
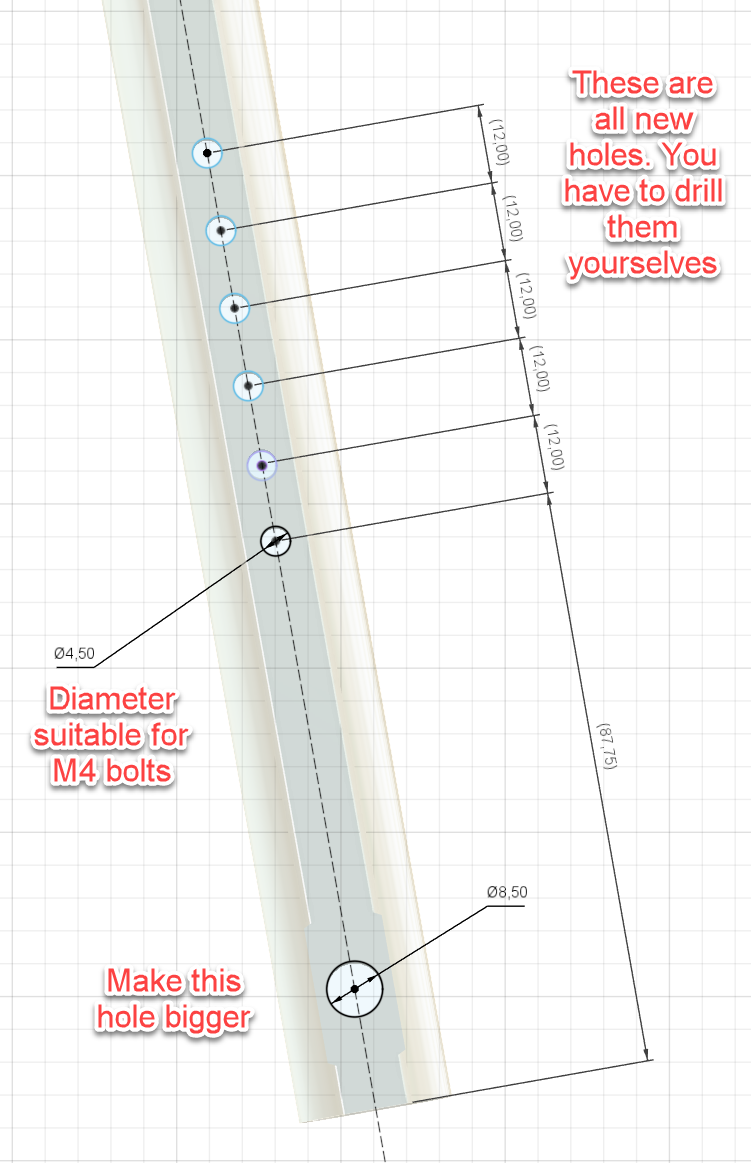
Additional 4.5 mm holes are drilled in the legs at 12 mm intervals. These provide several spring mounting positions so the suspension tension can be adjusted.
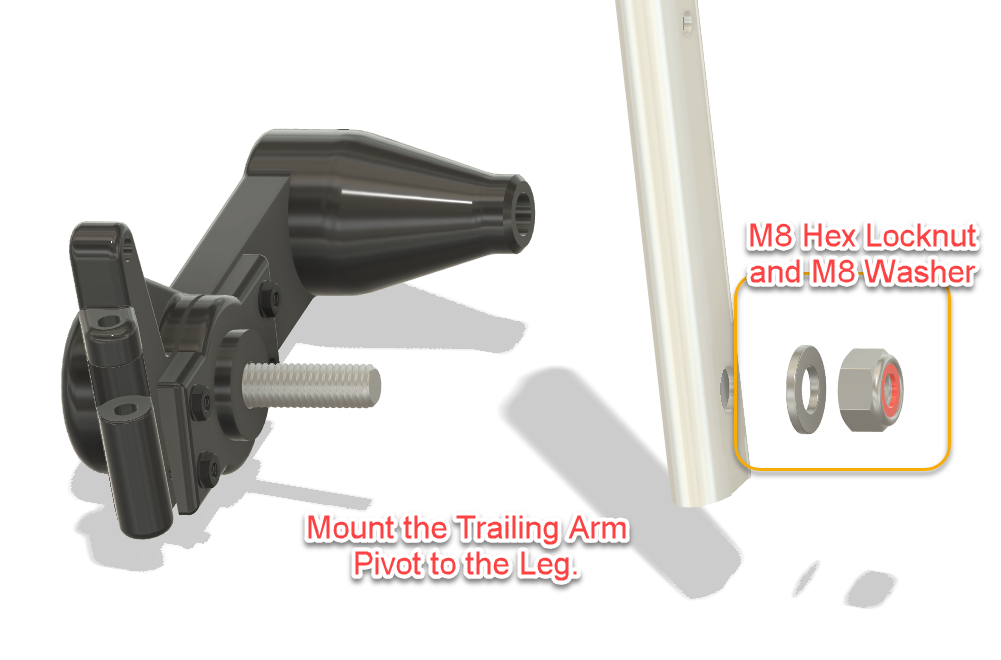
The lower existing hole is enlarged to 8.5 mm for mounting the trailing-arm pivot.
The original wheel components are retained where practical, while the newly designed parts form the suspension, bearing mounts and wheel guards.
3D printing the parts
All custom parts in my version were resin printed using Anycubic Water-Washable ABS-Like Resin V2.
To keep the wheelchair as light as possible, larger parts were printed hollow while retaining enough wall thickness and structural reinforcement for their intended load.
FDM printing should also be possible, but material choice and print orientation matter. These parts are structural: they carry the wheels, absorb shocks and experience repeated cyclic loading.
So this is not the ideal project for “three walls, 10% infill, she’ll be right.”
Strong and lightweight is the objective.

Building it yourself
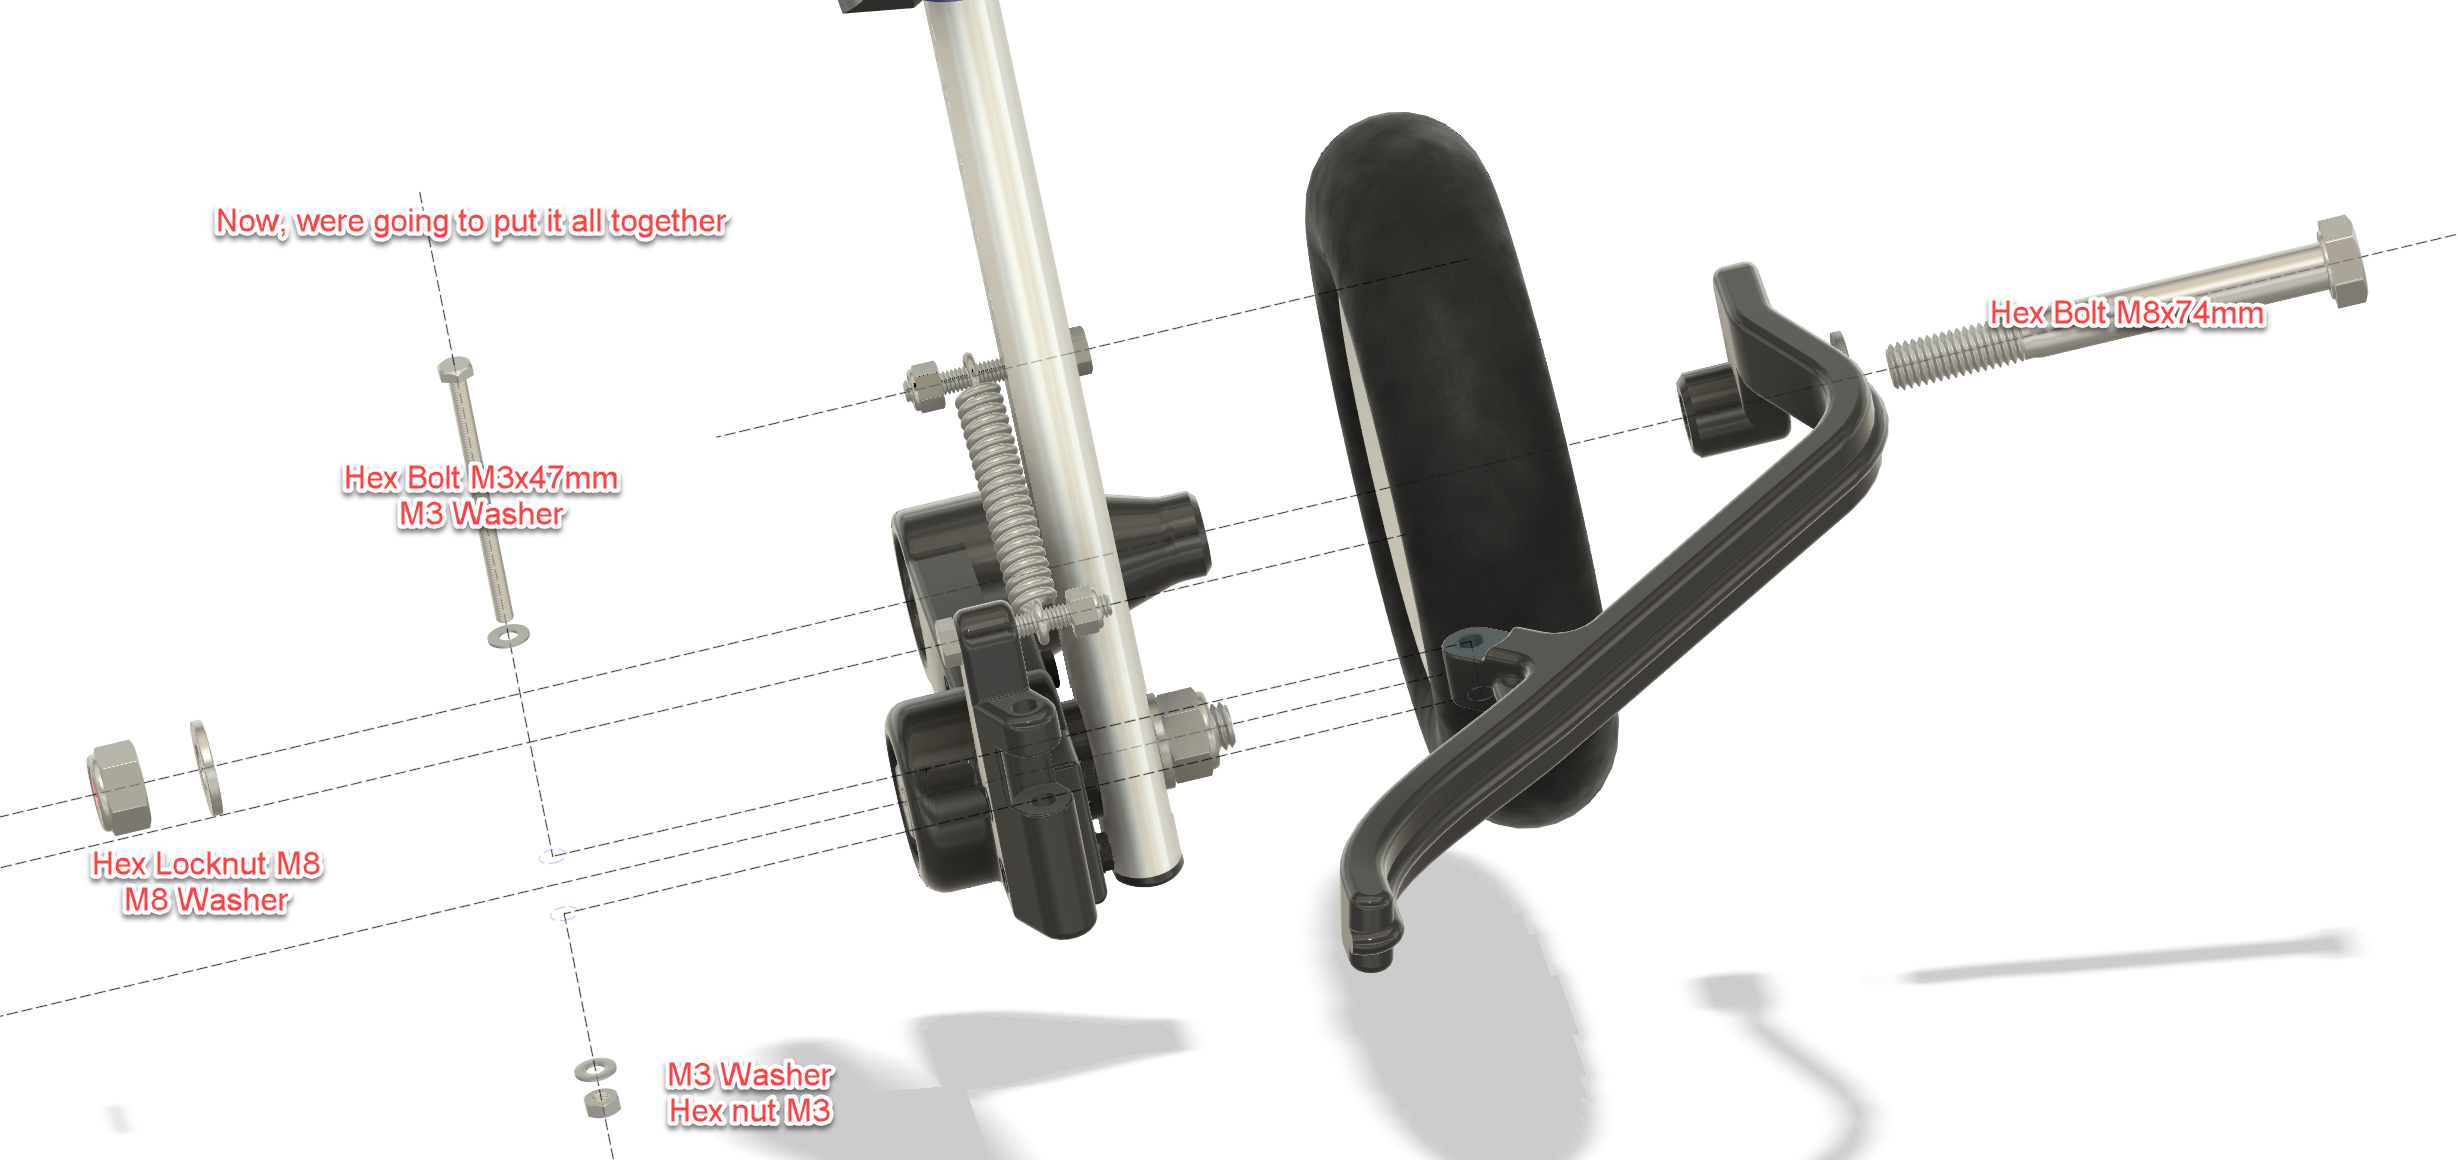
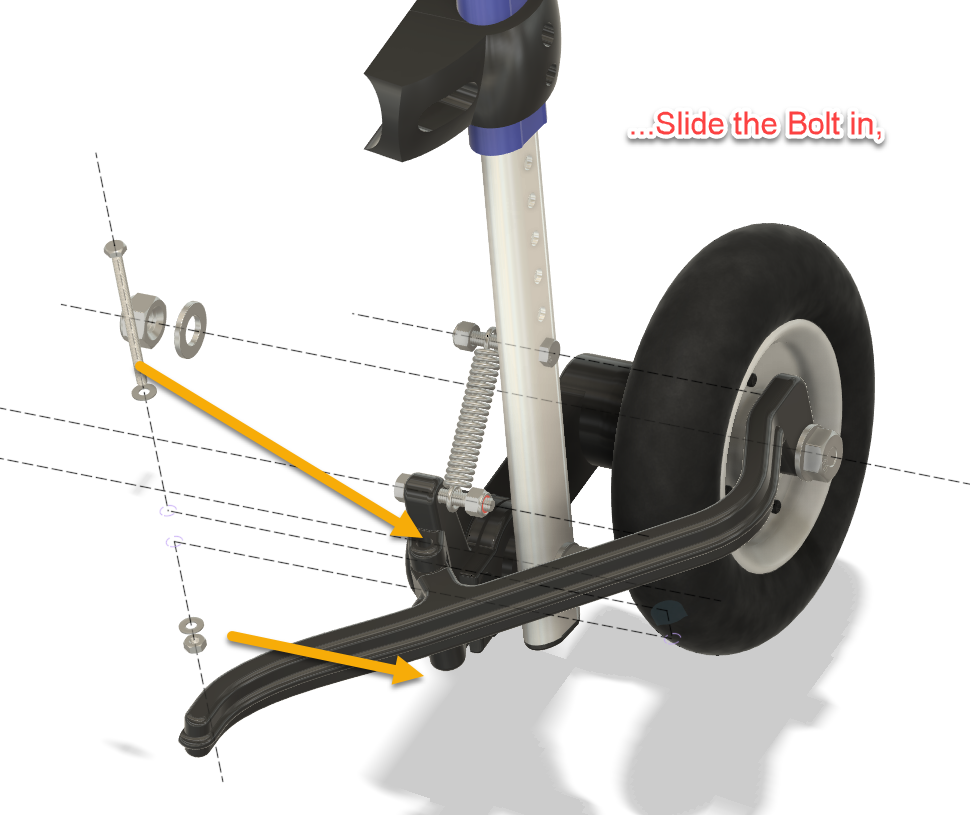
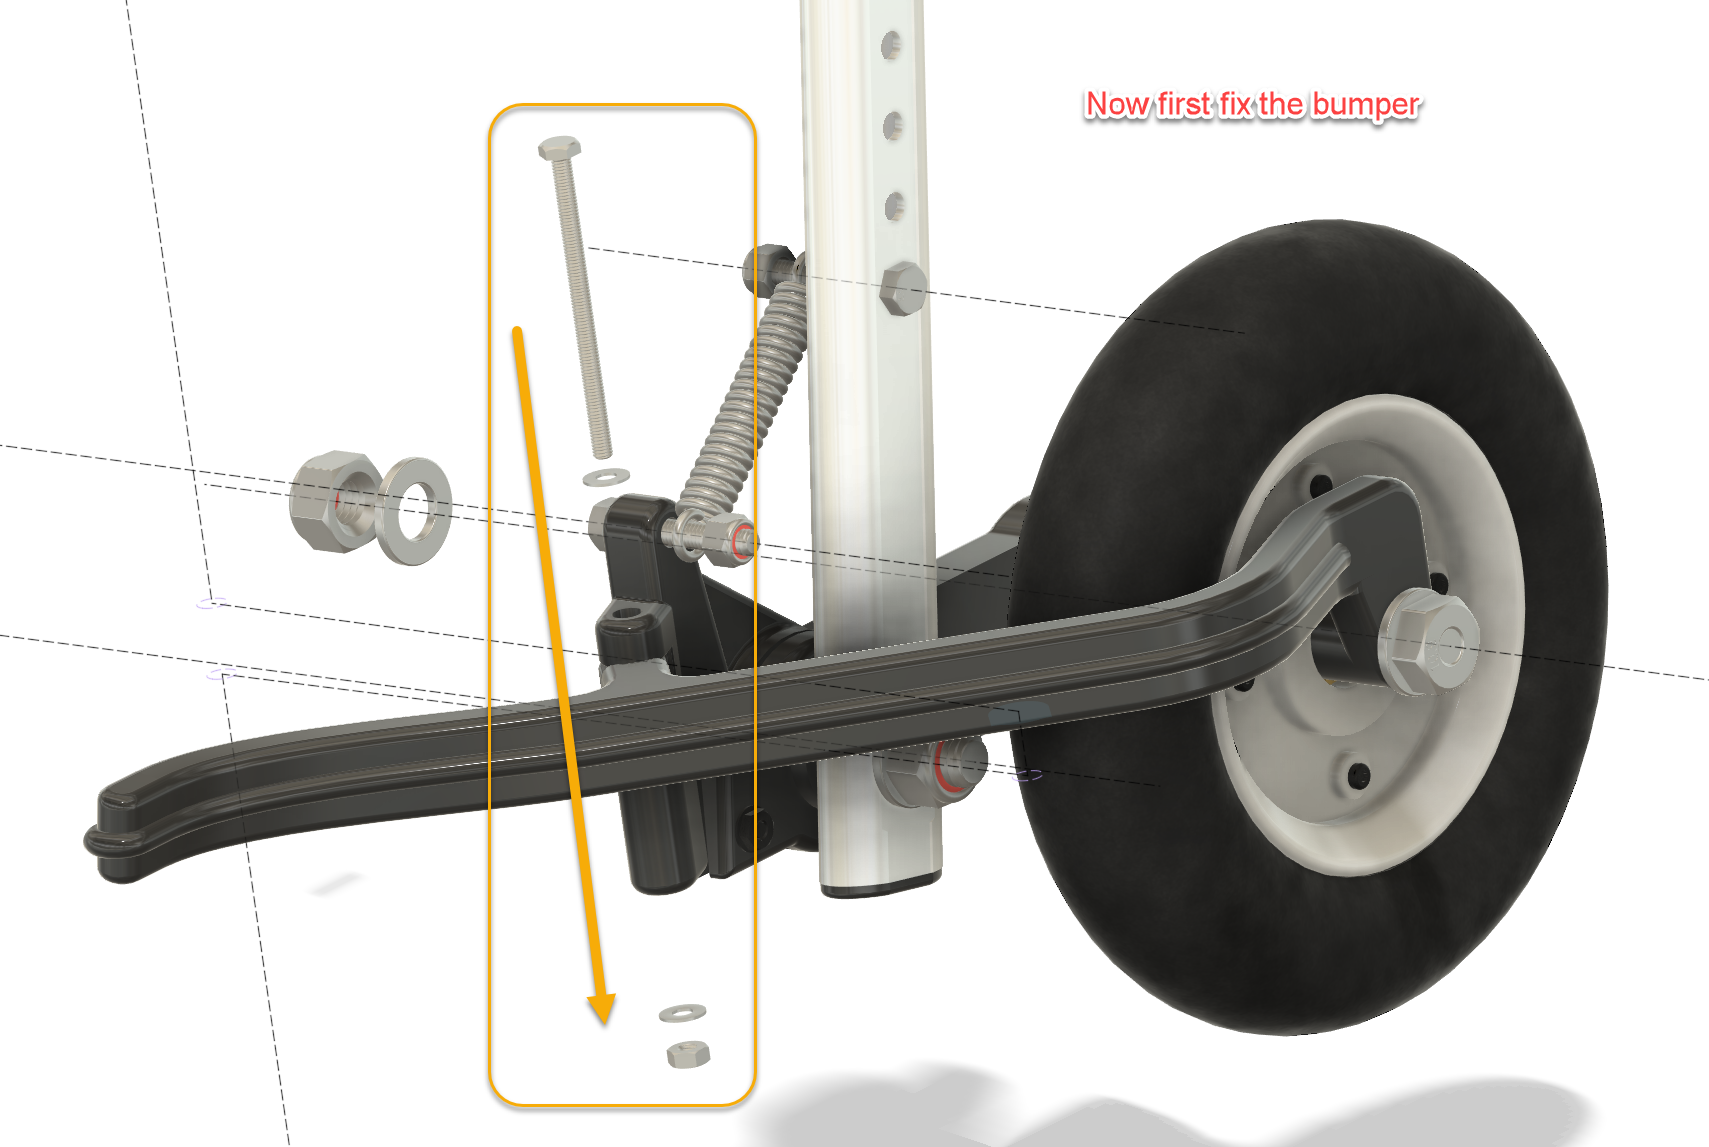
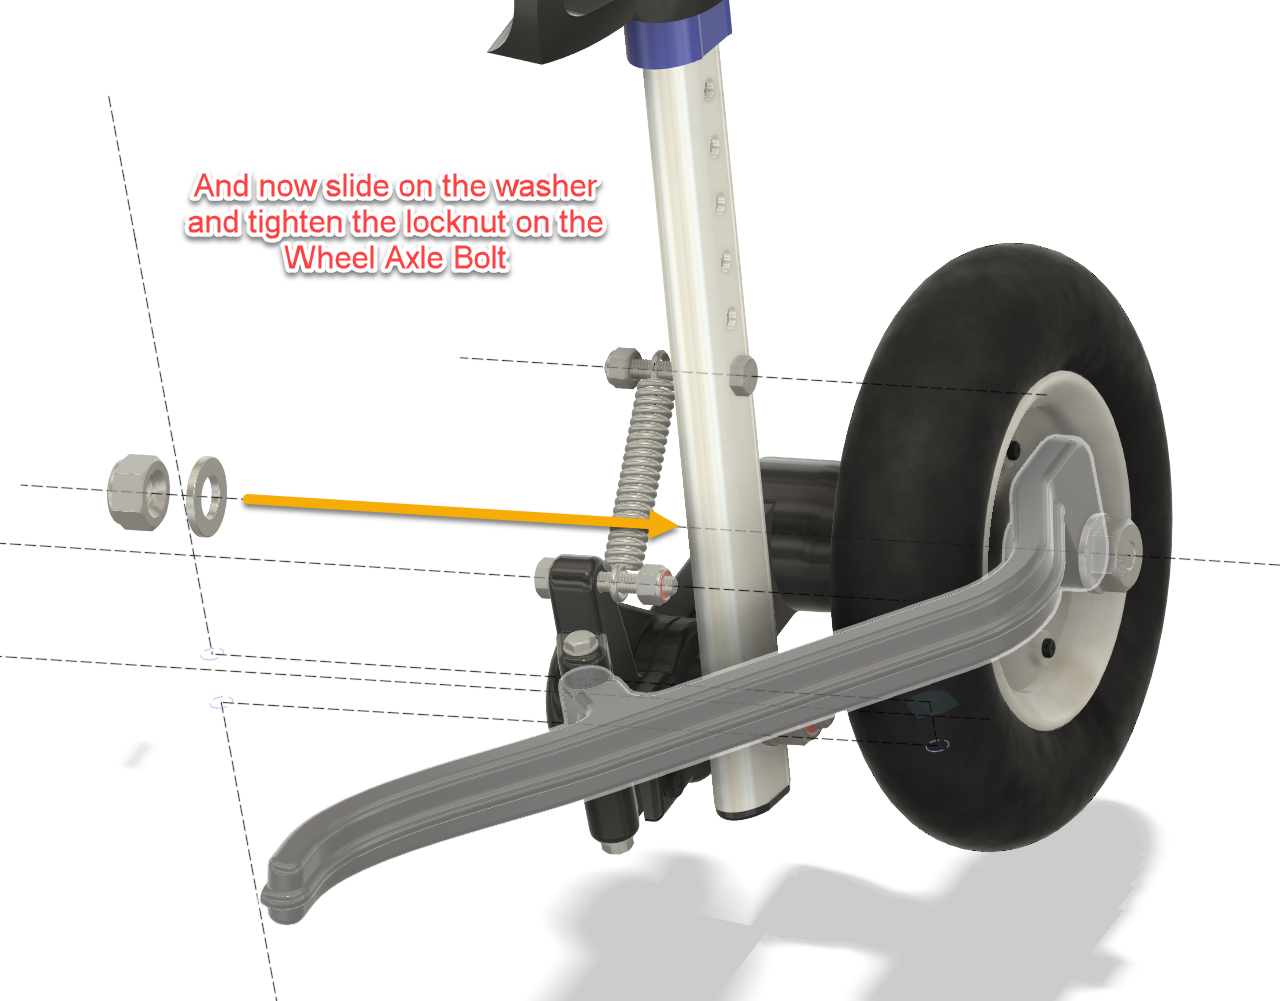
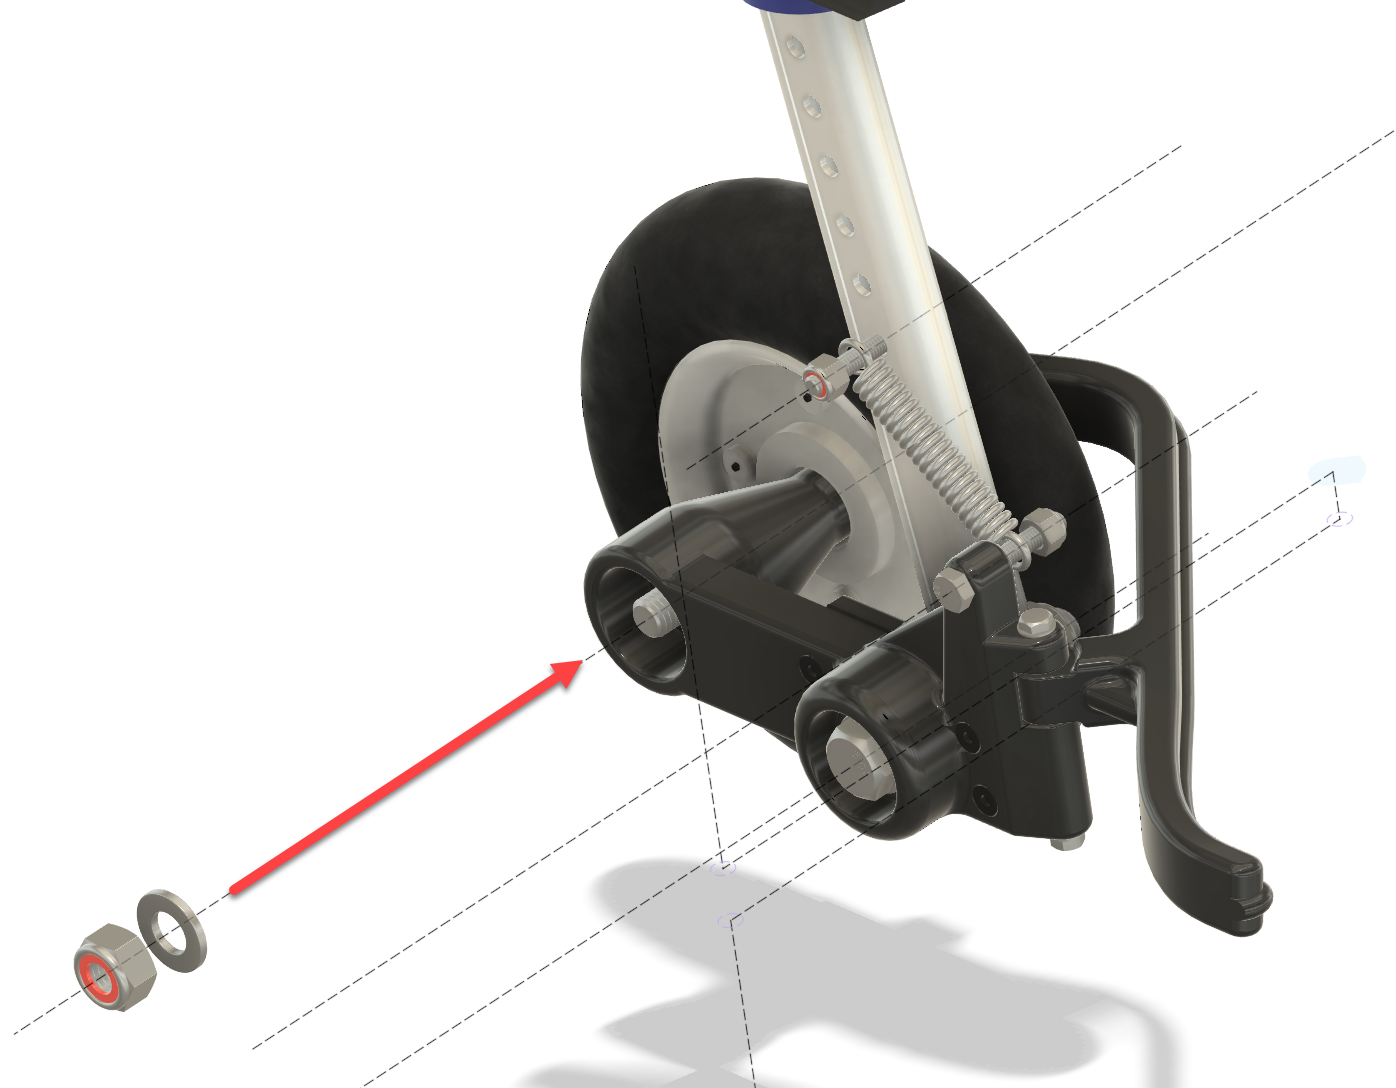
The project files include the printable components together with drawings and assembly illustrations showing how the conversion is made.
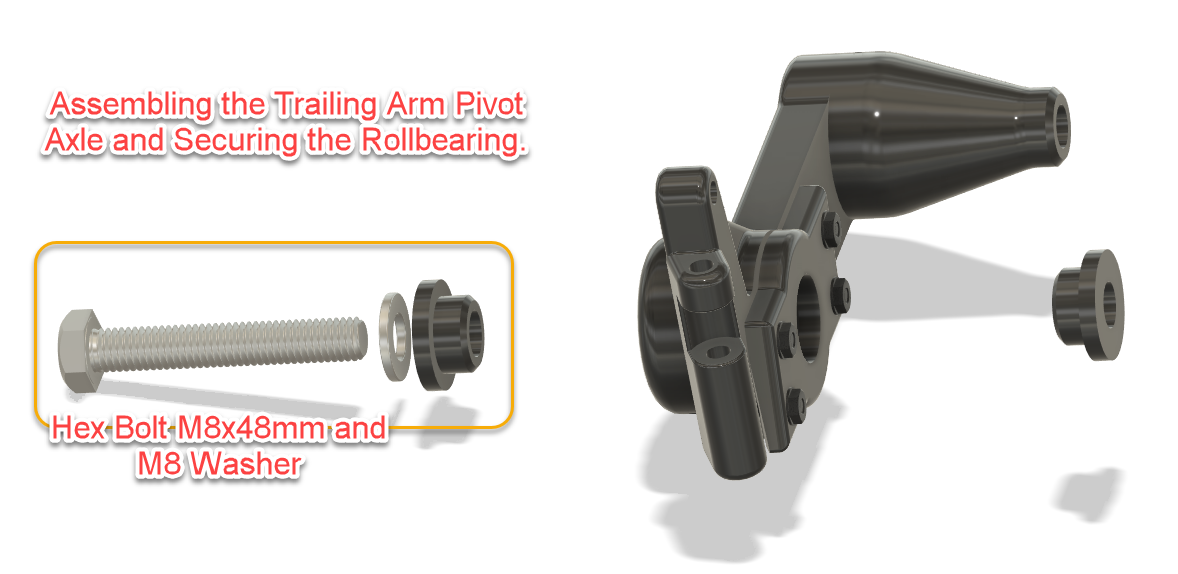
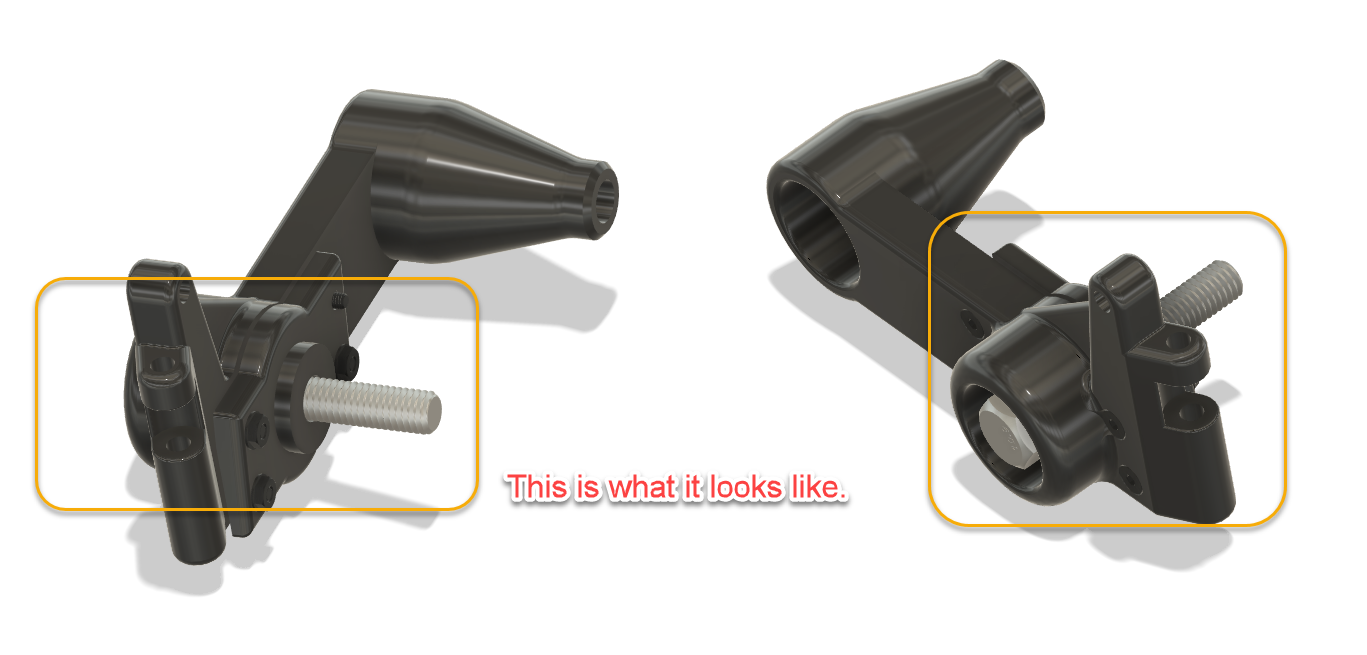
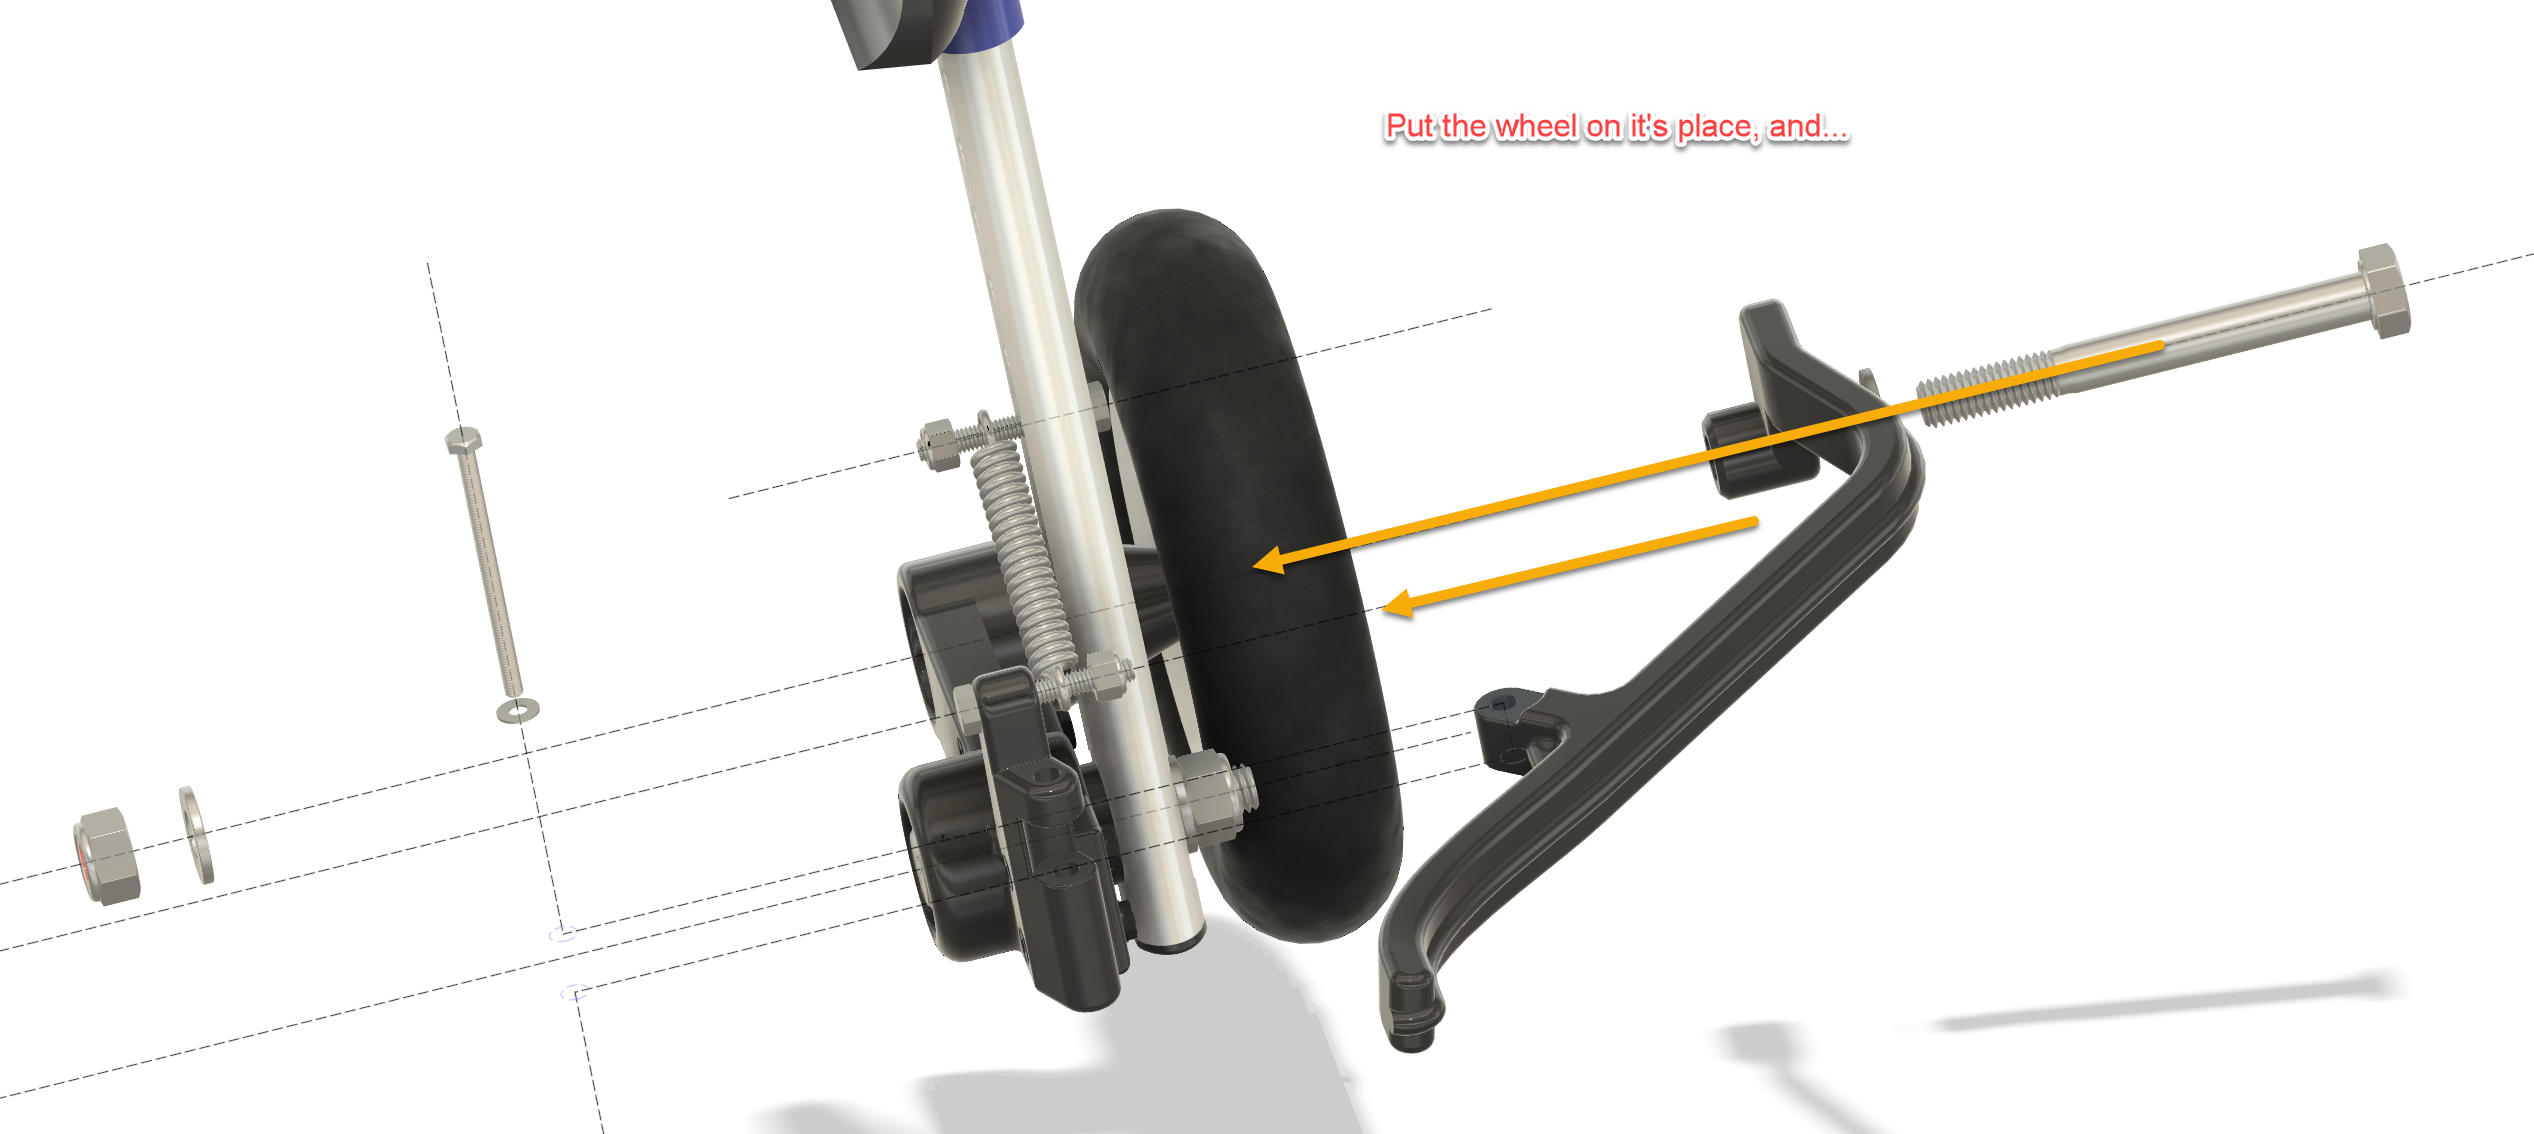
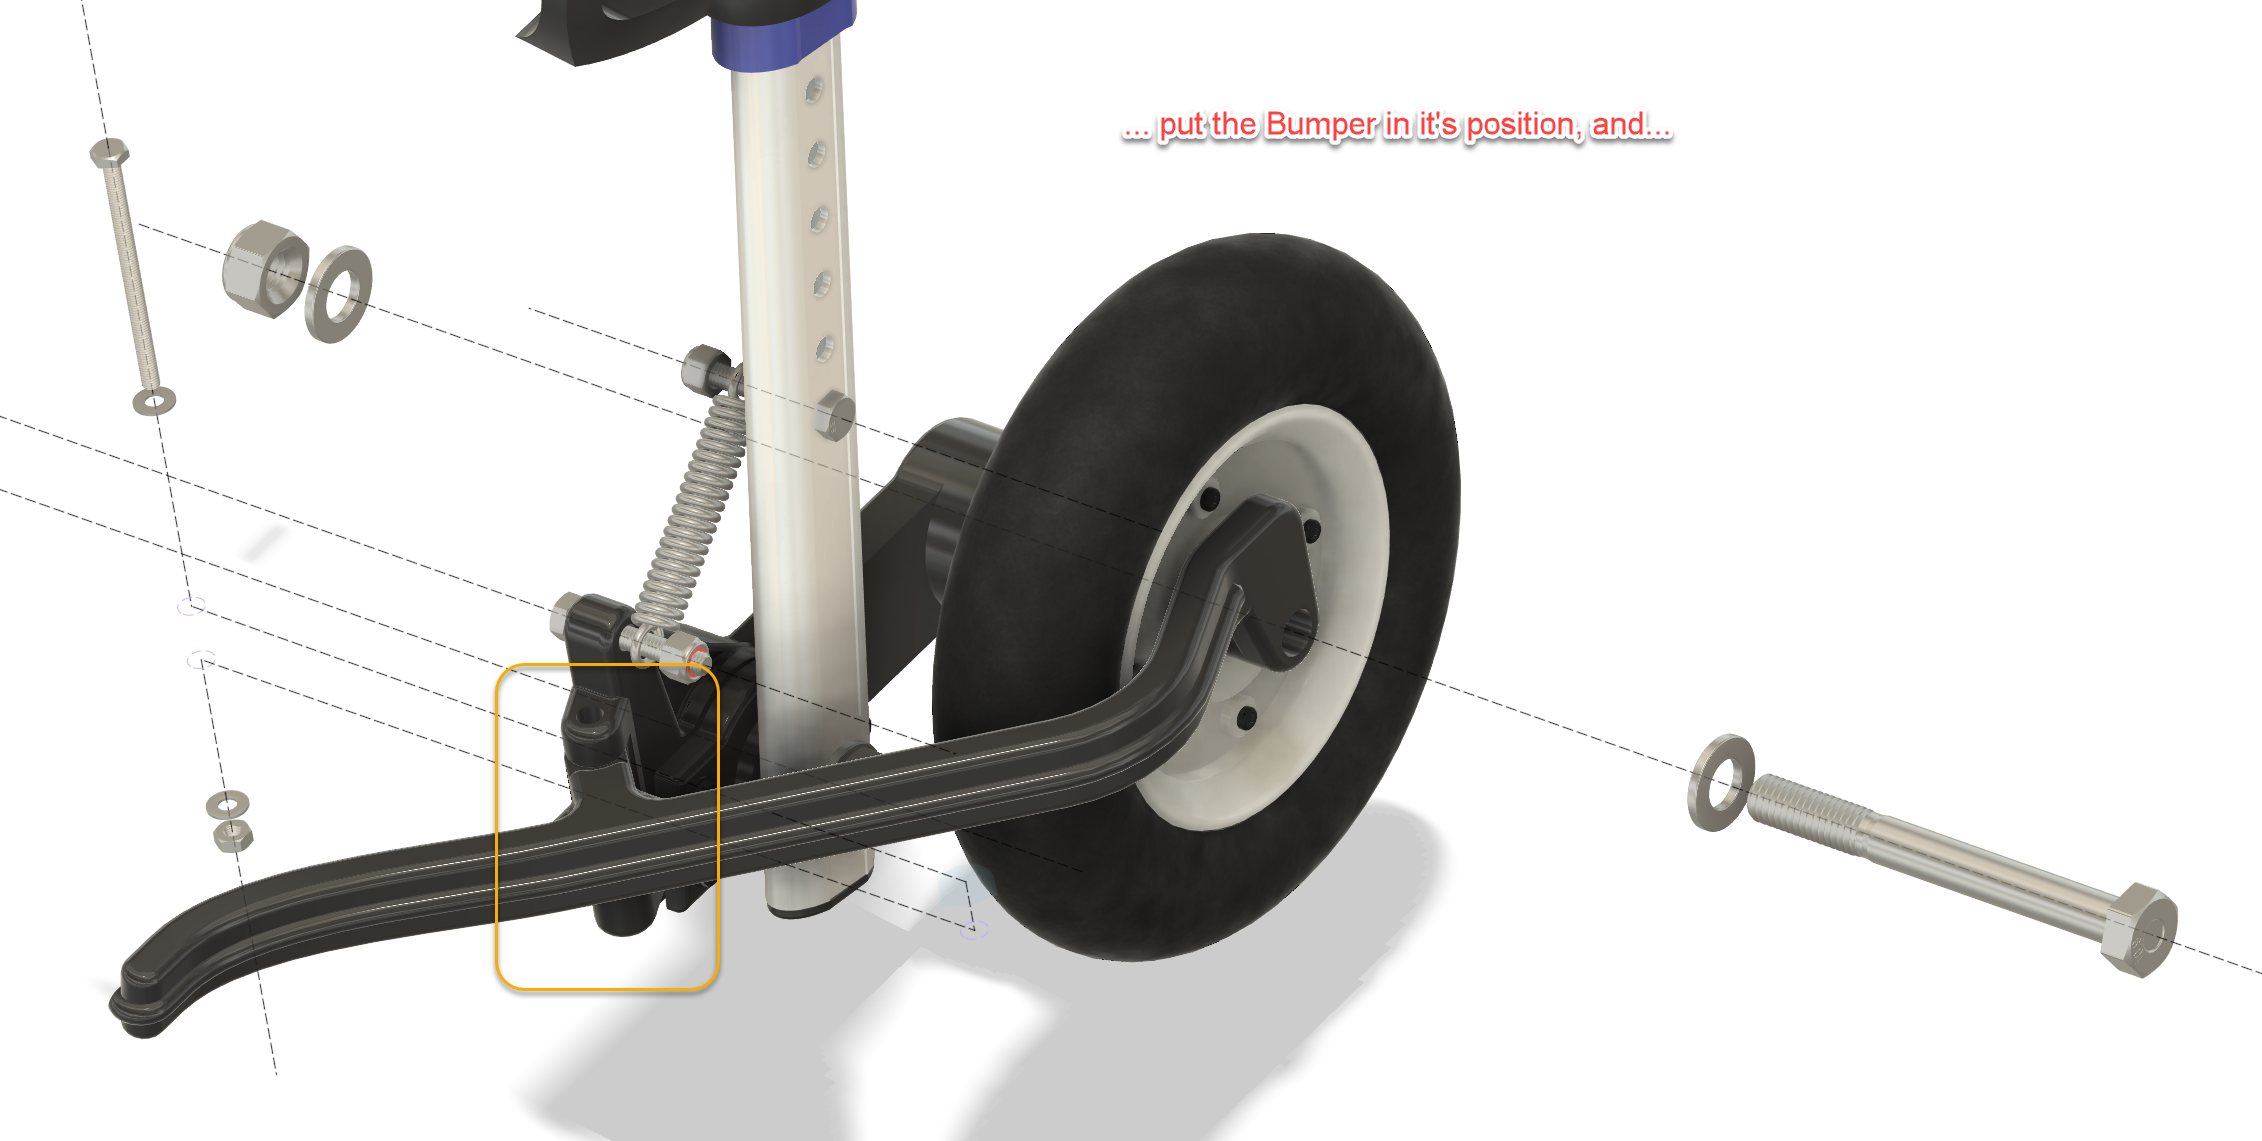
The build covers modification of the wheelchair legs, installation of the ball bearings, assembly of the trailing-arm pivots, spring mounting, wheel modification and final installation of the wheel guards.
Spring strength should be selected according to the dog’s weight. Each side of the suspension should be capable of supporting approximately half of the load carried by the rear of the wheelchair, with enough remaining travel for the suspension to actually do its job.
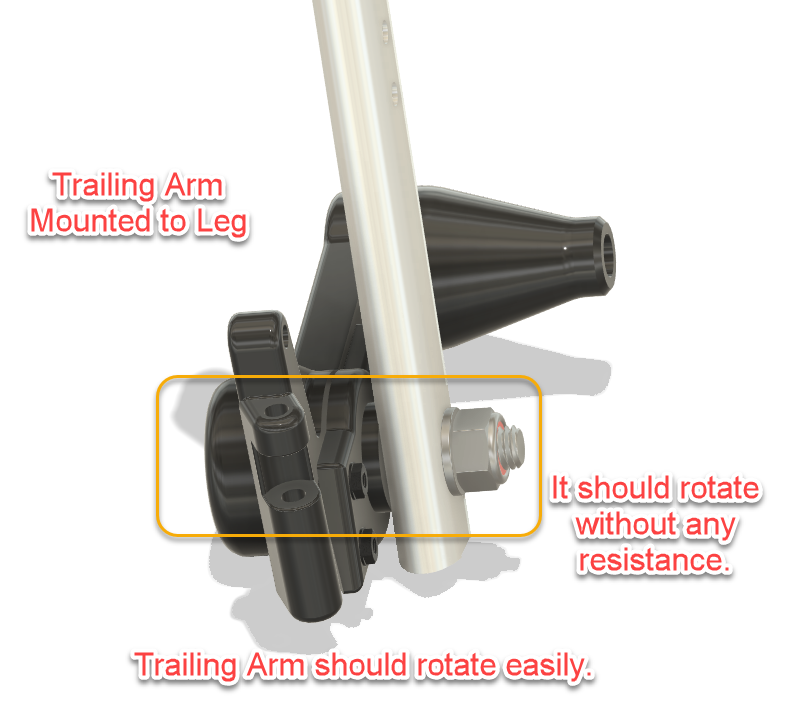
Once assembled, the trailing arms should rotate freely on their bearings without binding.
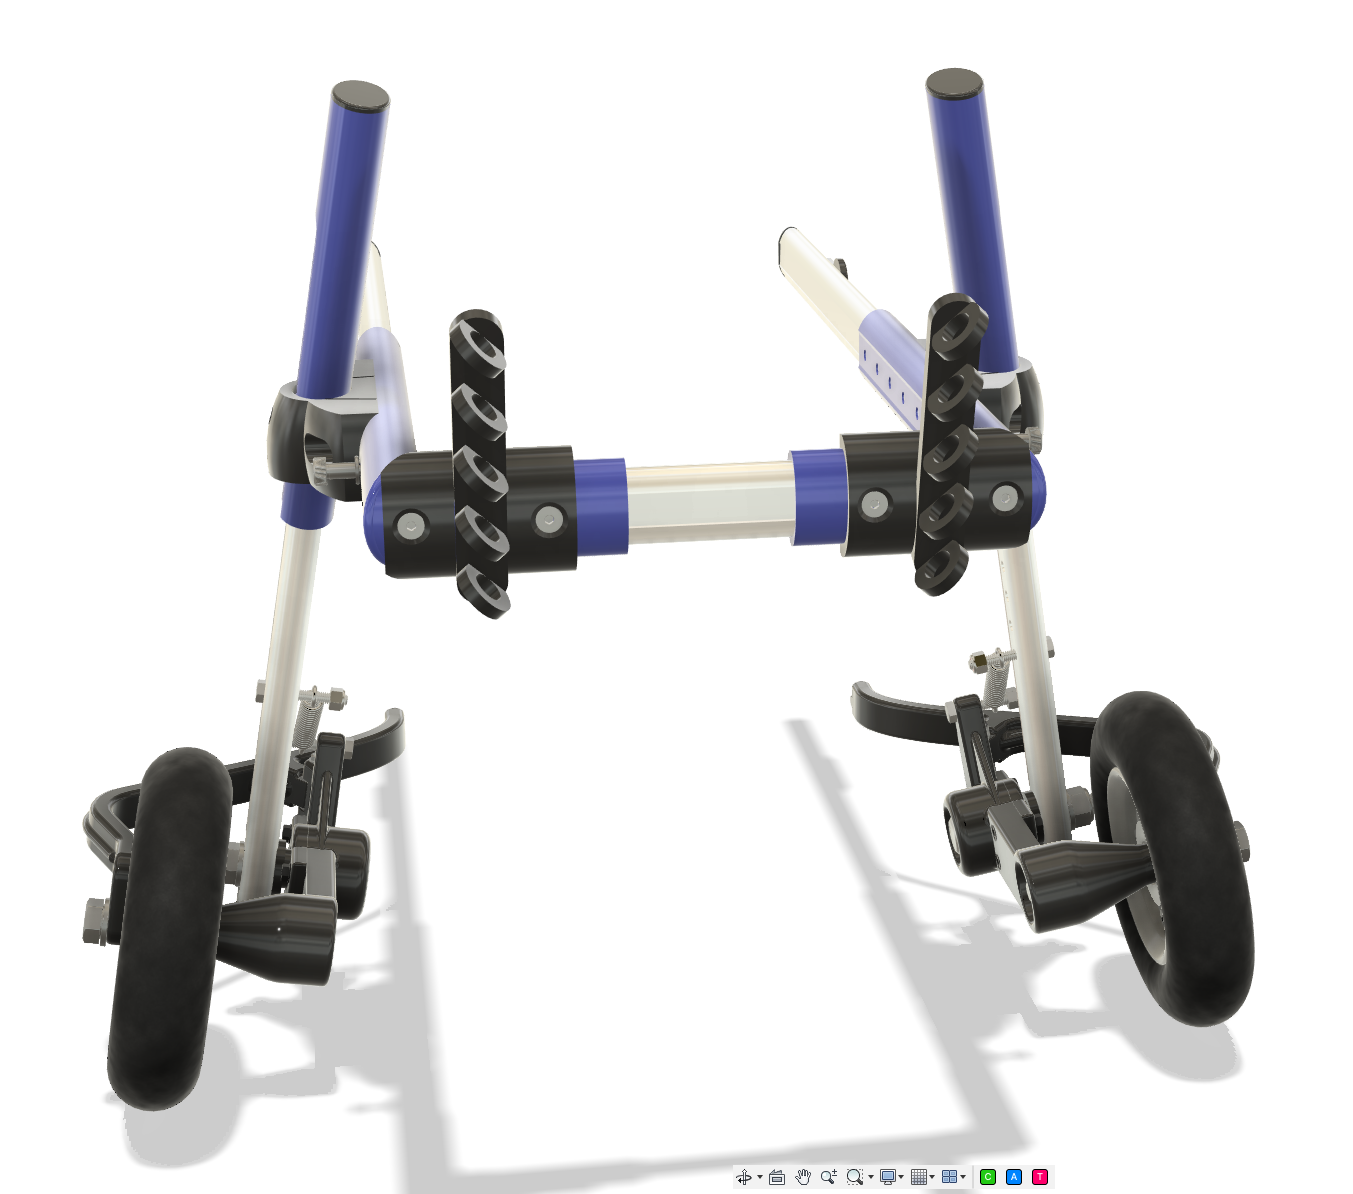
Please follow the assembling instructions in the pictures below.


The result
What started as an attempt to make the wheels turn a little easier ended up becoming a fairly substantial redesign of the rear wheel assembly.
Very much a case of:
“I’ll just improve this one small thing…”
Several CAD sessions, bearings, springs, bolts, prototypes and 3D prints later, the wheelchair had independent suspension.
But the important part is much simpler.
For our dachshund, it worked.
The wheels roll more freely, the suspension absorbs small shocks instead of transferring them directly into his back, and the guards prevent the wheels from catching abruptly on obstacles.
That made his walks easier and more comfortable — and gave him more opportunity to get outside and explore again.
And ultimately, that’s what this project was for.
Files included
The downloadable project contains the 3D-printable parts, a Bill of Materials for the required bearings, springs and fasteners, and illustrated assembly instructions showing the modifications and assembly sequence.
Feel free to adapt the design to your own situation. A button for downloading the original CAD file is added above. Dog wheelchairs, dogs and injuries differ, so consider this a starting point rather than a universal medical solution. Check the fit carefully, make sure nothing restricts or rubs against the dog, and adjust the suspension conservatively.
If you build one, I’d genuinely love to hear how it worked out.
Happy making — and, more importantly, happy walking.
Ready for some fun?
Does your dog hate rain?
→ The Dog TukTuk
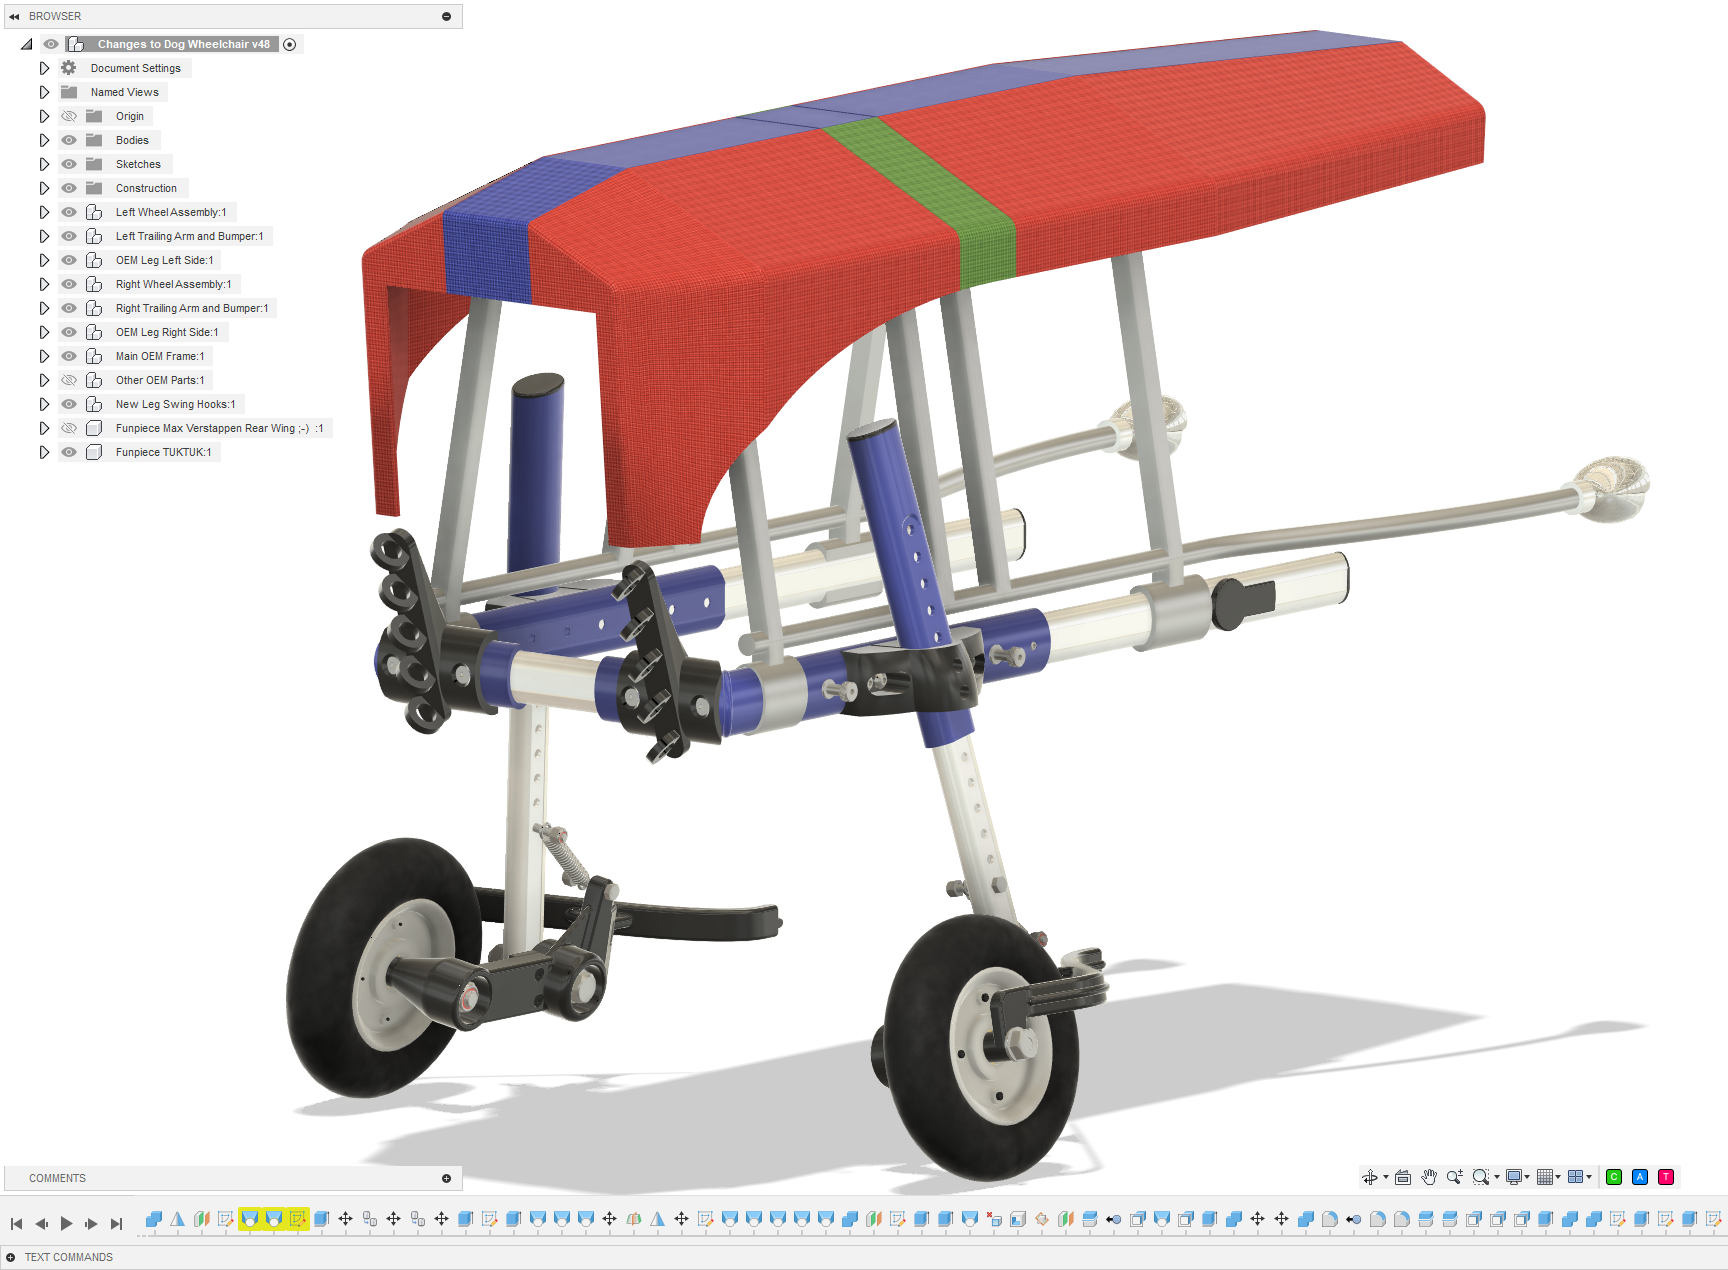
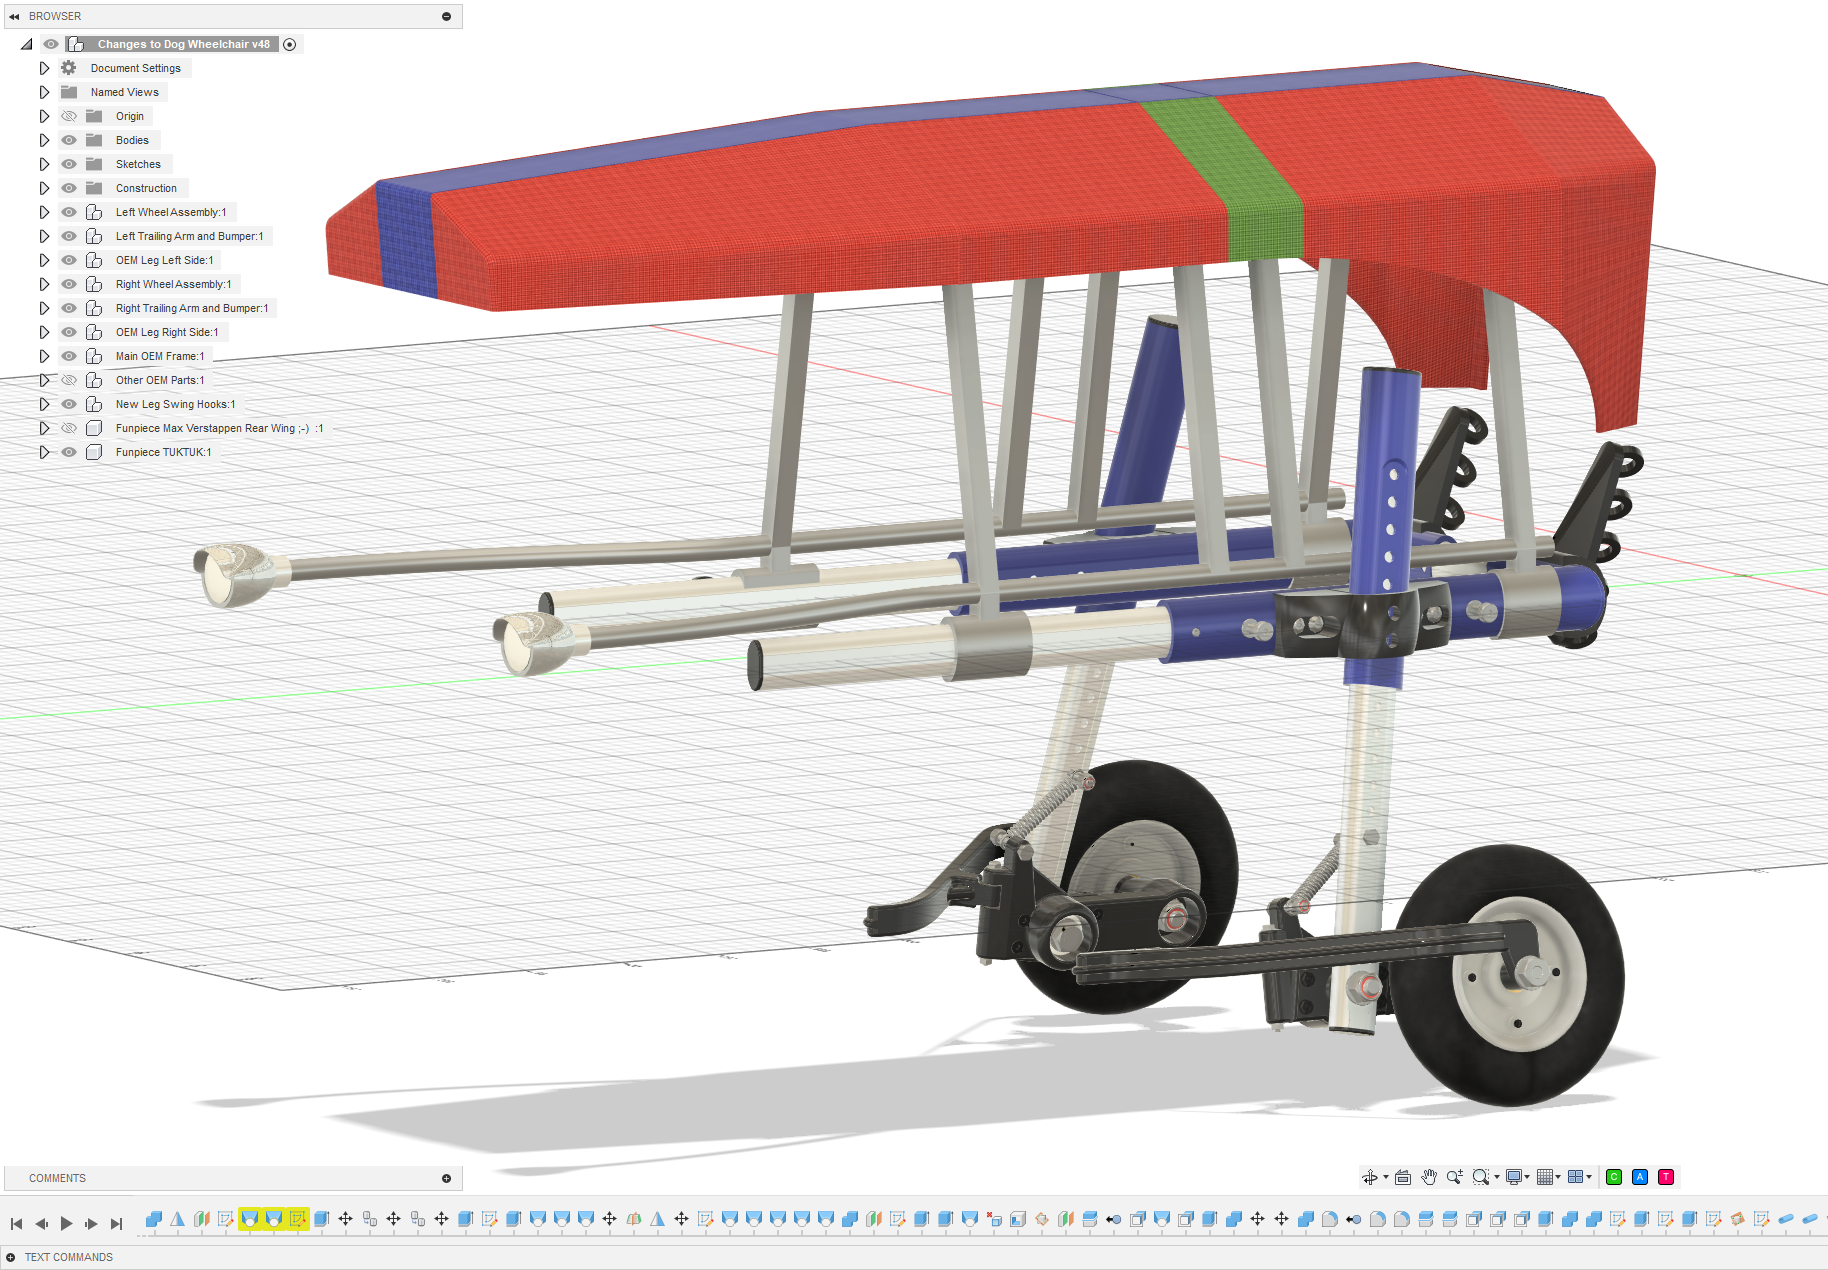
Why let a little rain ruin a perfectly good walk? Add a roof, a bit of aerodynamic styling and suddenly your dog has its own all-weather transport. The Dog TukTuk keeps the worst of the weather out while maintaining that essential “my human may have taken this project slightly too far” look.


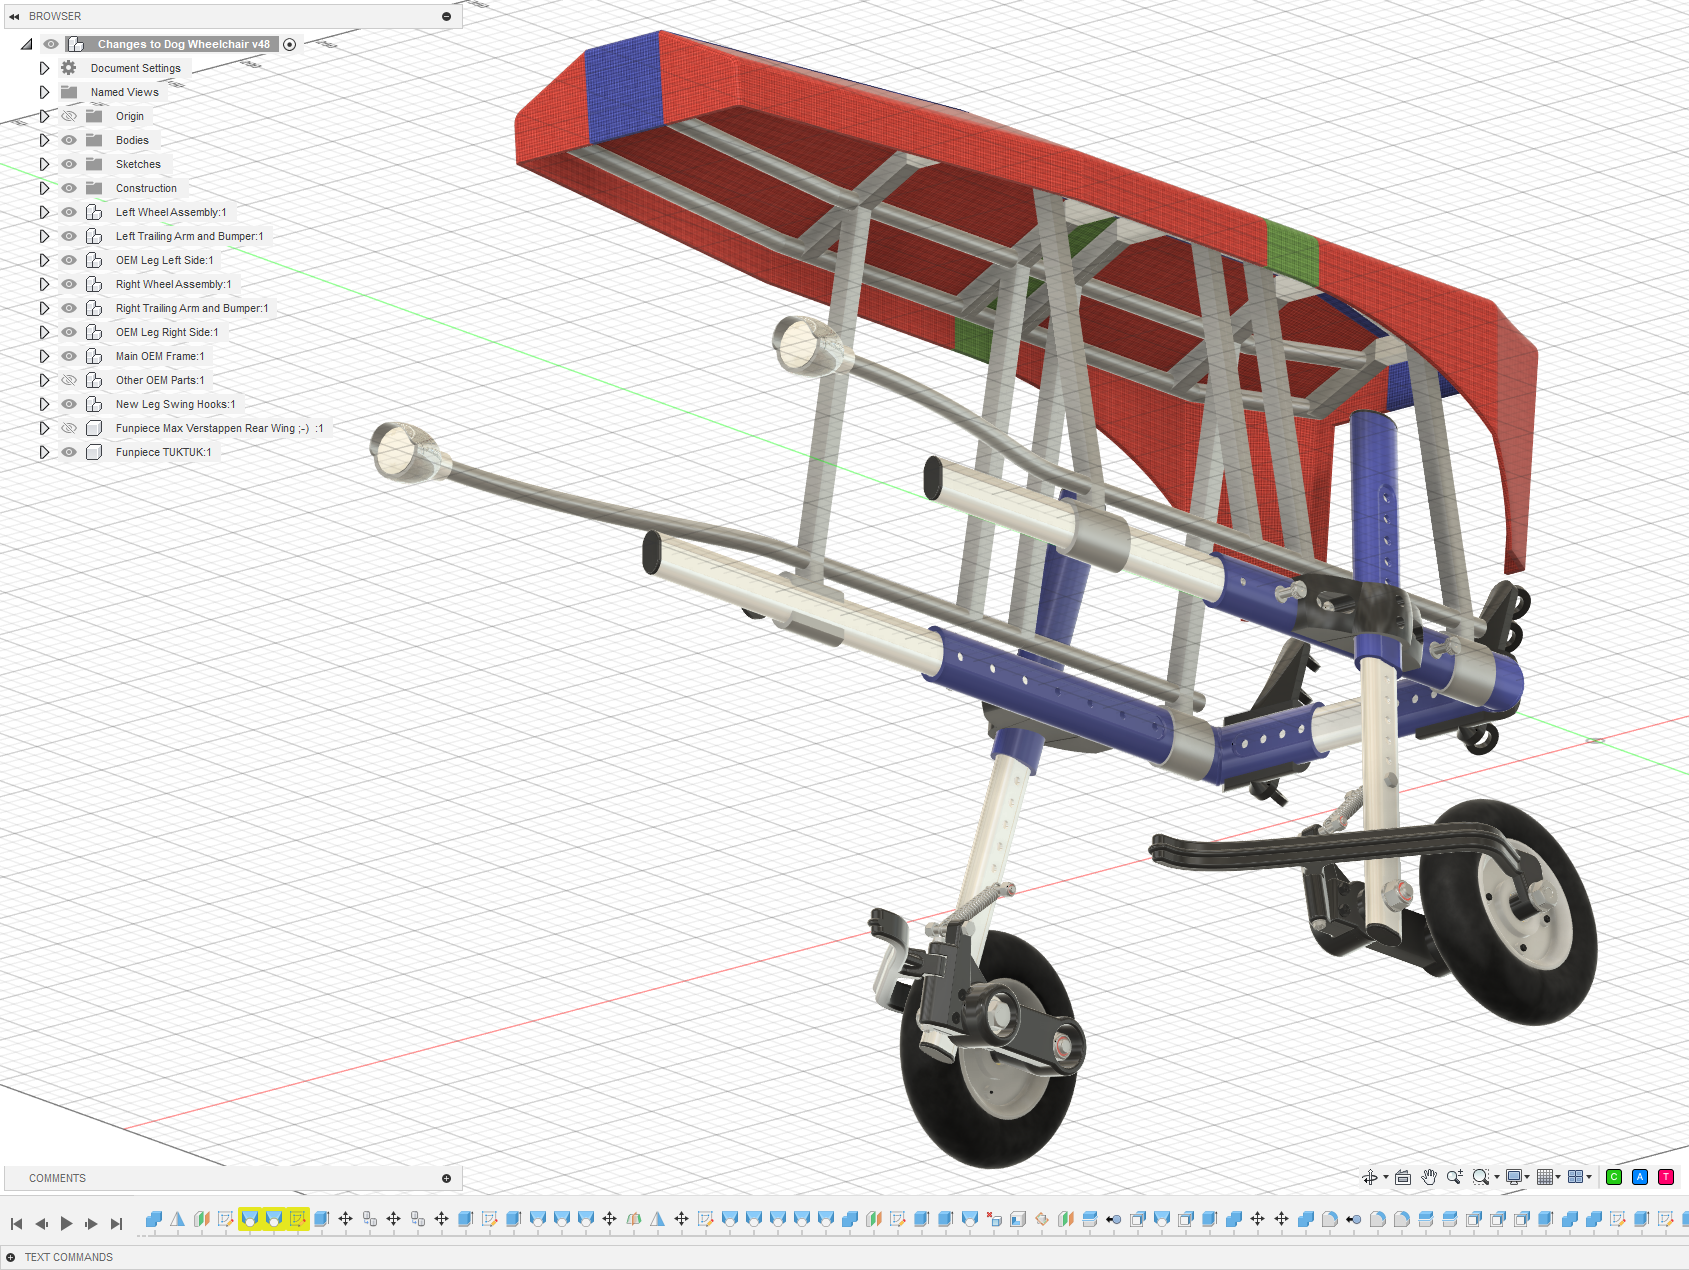
- Practical? Debatable.
- Ridiculous? Absolutely.
- Would I build it again? Obviously.
Is your dog extremely fast and in need of more downforce through the corners?
→ The Max Verstappen-worthy Rear Wing
When your dachshund starts suffering from high-speed oversteer, there is really only one sensible solution: more downforce.


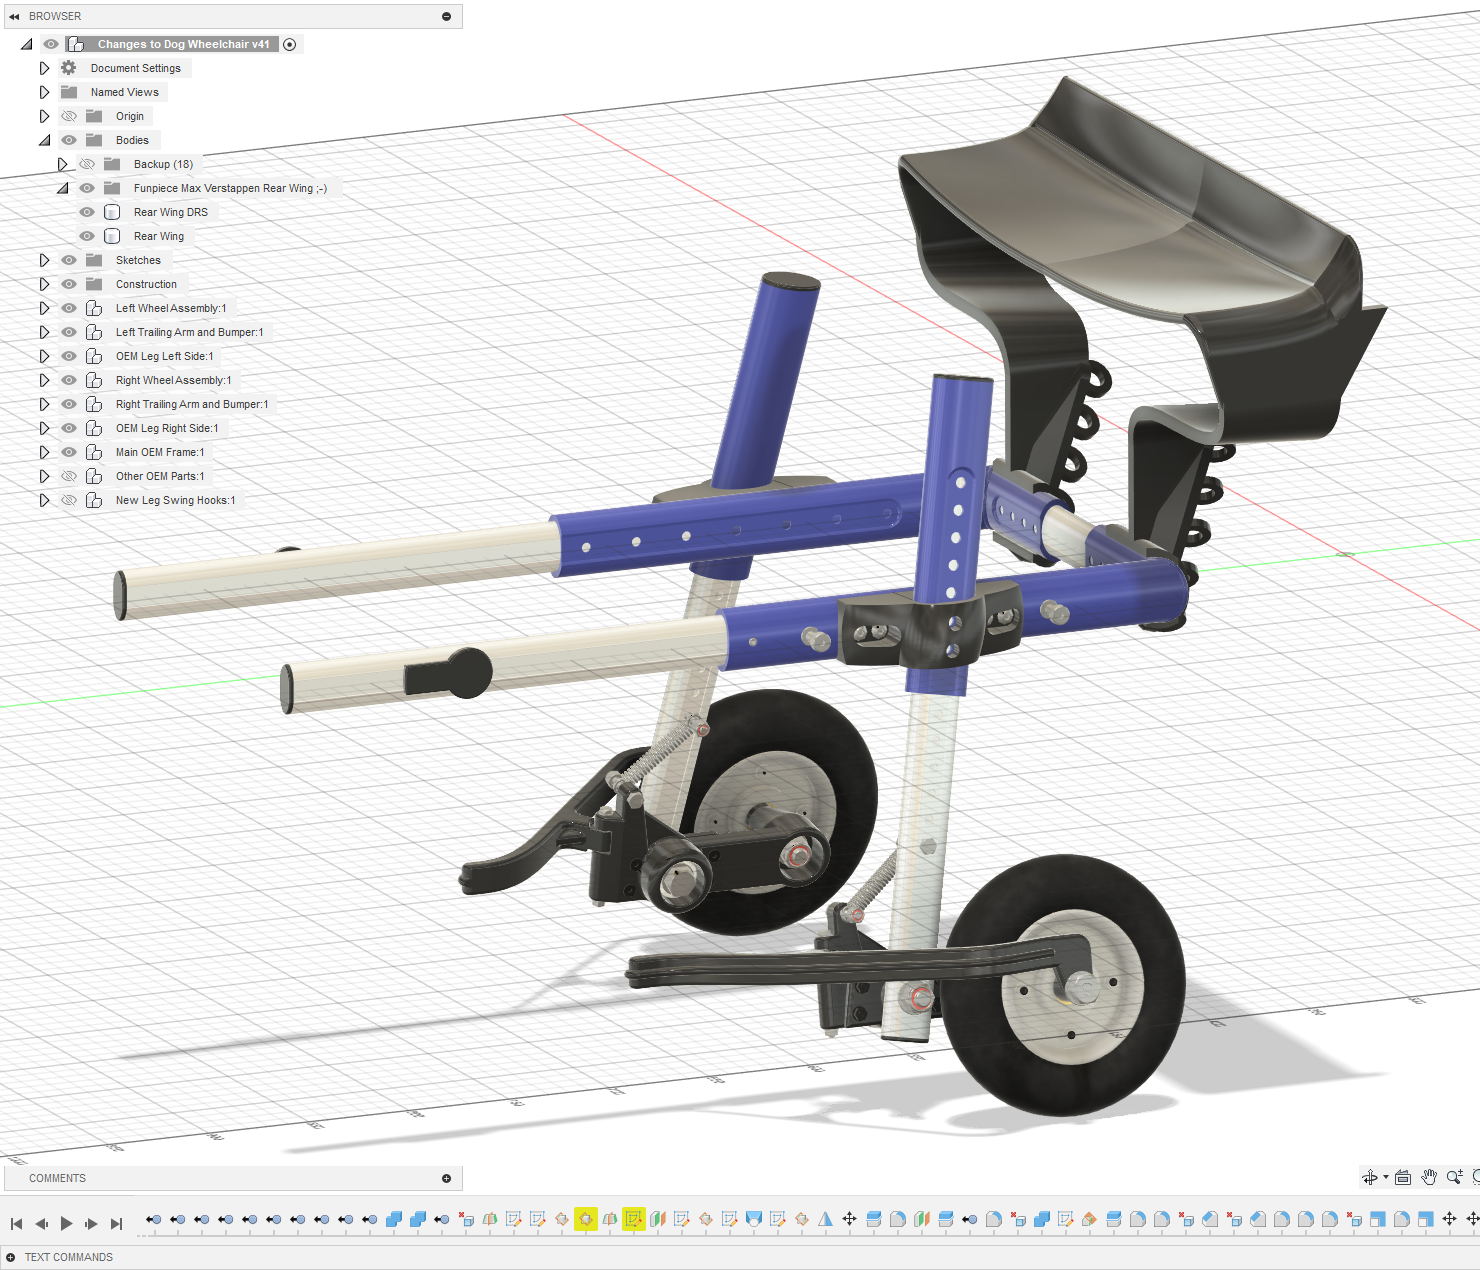
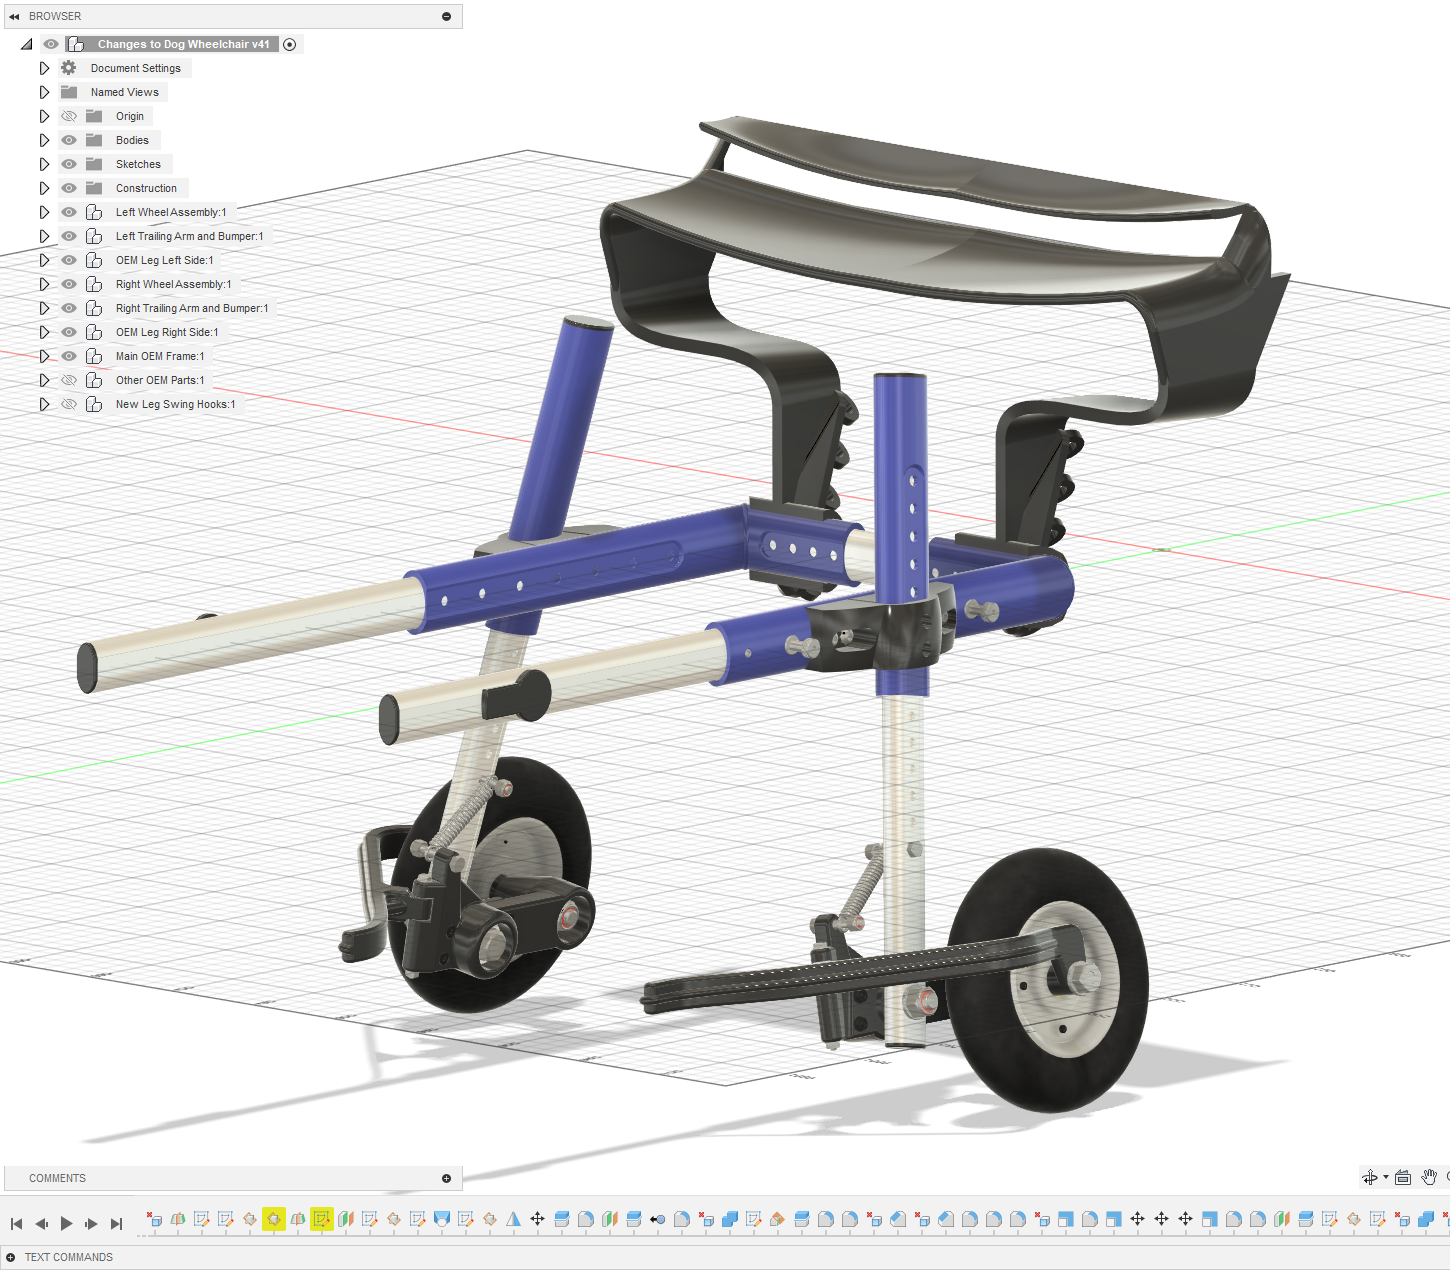
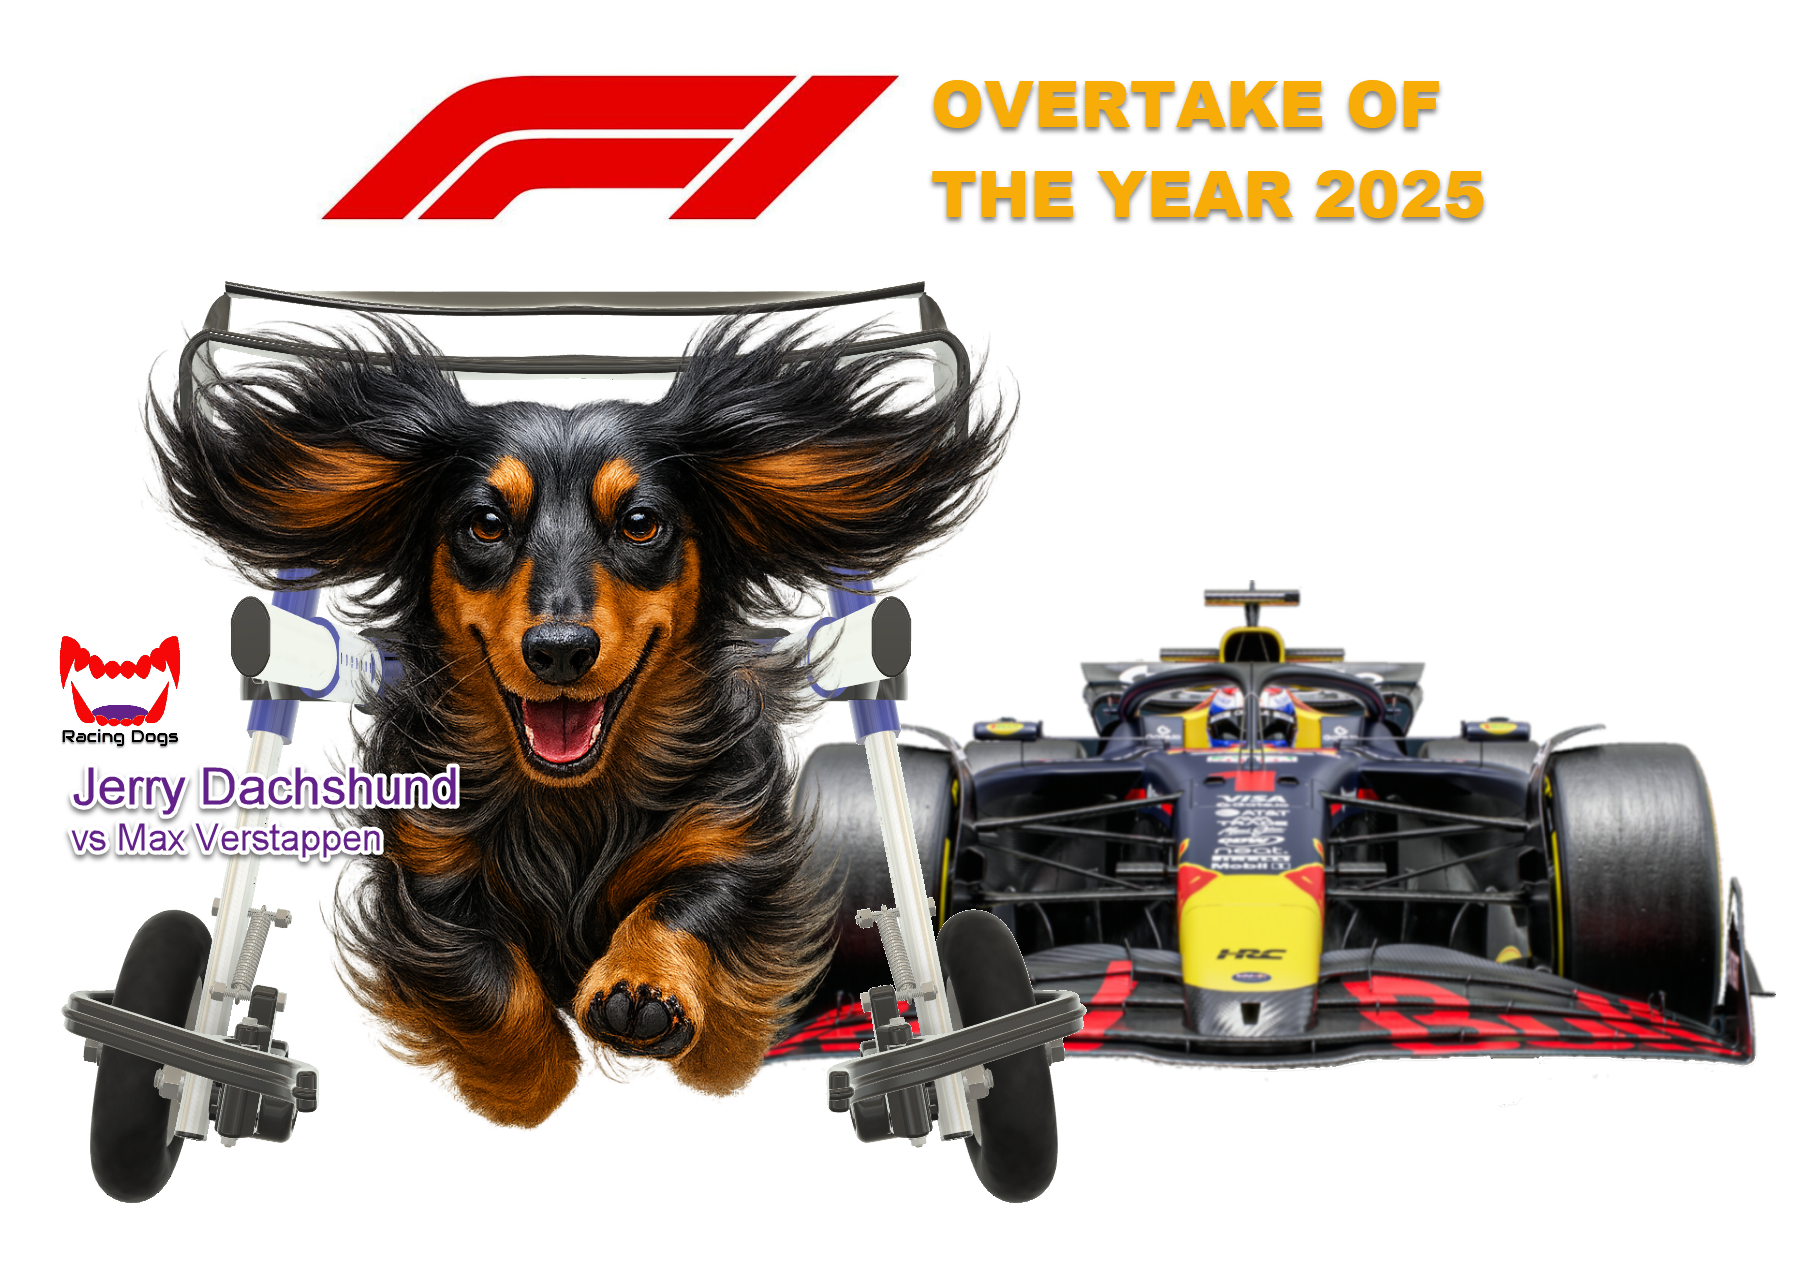
Inspired by Formula 1, this completely unnecessary rear wing adds serious racing credentials to the wheelchair. And because ordinary downforce clearly wasn’t enough, there is even a DRS version for those crucial overtaking manoeuvres on the way to the food bowl.
- Wind-tunnel tested? No.
- FIA approved? Definitely not.
- Does it make the wheelchair faster? Jerry thinks so.